Party food

This is another recipe I had in my draft mode but was able to add and correct the photo issues I was having.
Jim came across this recipe and could not wait for me to make it and lucky for him he did not have to wait at all as I had all the ingredients on hand except the candy bars but I had toffee bits so I used those. I do think using the candy bars would be better though and give you a little more of a crunch in the blondies. But depending on what your grocery store has the toffee bits did work. These bars are sweet, salty with a little crunch and something much different from the average brownie.
INGREDIENTS
- 8 Tablespoons on unsalted butter (1 stick)
- 2 (1.4 ounce ) Heath candy bars
- 1 cup packed light brown sugar
- 1 large egg
- 2 Tablespoons water
- 1 Tablespoon vanilla extract
- 1 1/4 cups all purpose flour
- 1/2 teaspoon baking powder
- 1/2 teaspoon kosher salt
- 1 Tablespoon granulated sugar
- flaky salt for sprinkling on the top
INSTRUCTIONS
pre heat oven to 350 degrees. Spray a 8×8 baking dish with non stick spray and set aside. Cut the stick 0f butter into 1/2 inch cubes and melt in small sauce pan over medium heat. Cook and stir constantly while scraping the bottom of the pan with a rubber spatula to release any brown bits, until the butter is light brown and smells nutty and no longer foamy. 3-4 minutes. Immediately scrape into a heatproof bowl and let cool for 15 minutes. Meanwhile courtly chop the Heath bars into 1/2 inch pieces. About 3/4 cup.
Add the brown sugar, 1 large egg, 2 Tablespoons of water and 1 Tablespoon of vanilla to the browned butter and whisk until smooth and glossy. Add the flour, baking powder and salt. Stir until a thick batter forms. Reserve 2 Tablespoons of the chopped toffee for the top then fold the rest into the batter.
Transfer the batter to your prepared baking dish and smooth to make an even layer. Scatter the reserved toffee over the top then sprinkle with the Tablespoon of sugar.
Bake until the edges are browned and pulling away from the edges of the pan and the toothpick inserted in the center comes out clean, about 18-23 minutes. Remove from oven and sprinkle with flaky salt. Let cool in the pan at least 20 minutes. Cut into squares and serve.
Enjoy!


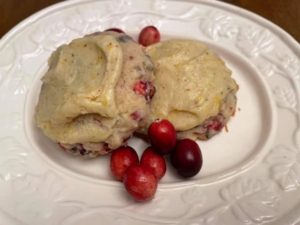
It’s been a while! Life has been busy and full of ups and downs the past couple years! My husband Jim was deployed to Afghanistan and got back just over a year ago. So with Jim being away and then returning we spent much of the time after he returned traveling and visiting family and friends we have finally started to settle down and get back into our normal routines.

We recently spent a few days in Cape Cod Massachusetts with friends. We went to Provincetown and did some shopping and dined at a terrific Italian restaurant on the water, visited the Mayflower and Plymouth Plantation. While we were there we purchased 3 pounds of fresh cranberries right from the bog. When we got home I could not wait to do some baking with all the cranberries. This cookie recipe is a new holiday favorite, I’m already planning to make them again! I shared them with some of our neighbors and they loved them as much as we did!
I made just a couple very small changes to the frosting recipe and you will see those notes in the recipe.
INGREDIENTS
1/2 cup of butter softened
1 cup of sugar
3/4 cup packed brown sugar
1/4 cup whole milk
1 large egg
2 Tablespoons orange juice
3 cups all purpose flour
1 teaspoon baking powder
1/2 teaspoon salt
1/4 teaspoon baking soda
2 1/2 cups fresh cranberries, chopped
1 cup chopped walnuts or pecans
FROSTING INGREDIENTS
1/3 cup butter
2 cups confectioner’s sugar
1 1/2 teaspoon vanilla extract
2-4 Tablespoons hot water…..for this I used fresh squeezed orange juice (not warmed) I also added some of the zest from the orange.
DIRECTIONS
In a bowl cream butter and sugars. Add milk, egg and orange juice, mix well.
Combine the flour, baking powder, salt, baking soda and add into the creamed creamed mixture and mix well. Stir in cranberries and nuts.
Drop by Tablespoons 2 inches apart on a greased cookie sheet and bake at 350 degrees until golden brown, about 12-15 minutes. Cool on wire racks.
For the frosting-
Heat the butter in a saucepan over low heat until golden brown , about 5 minutes. Cool for a couple minutes and transfer to a bowl. Add the confectioner’s sugar and vanilla. Beat in the hot water or in my case fresh sneezed orange juice 1 Tablespoon at a time until frosting reaches desired consistency. I kept my frosting on the thicker side.
Frost the cookies and enjoy!
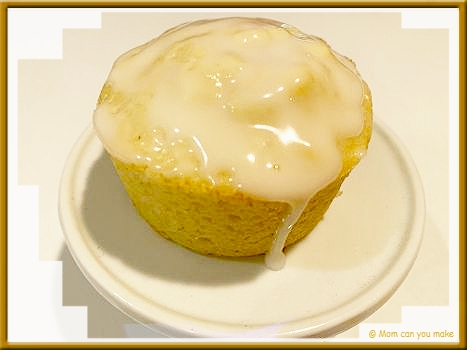
This recipe comes from Gluten-Free on a Shoestring, I found this recipe on Pinterest but have made many items from the Gluten-Free on a Shoestring blog. They are tried and true and this recipe is no different. Not only did Robby enjoy these gluten-free bites, but I did too. I like to use flour from Karma Baker. She specializes in Gluten-free /Vegan baking products. You can find her products online. I have ordered a number of things from her including her cookies and baked goods and I’m always pleased with the quality. https://karmabaker.com/shop/
INGREDIENTS
- 8 Tablespoons unsalted butter
- 1 cup granulated sugar
- 2 eggs, beaten
- 1 1/2 teaspoons vanilla extract
- 1 1/2 cup all-purpose gluten-free flour
- 3/4 teaspoon xanthan gum (omit if your flour has it in it already, Karma Baker includes it)
- 1 1/2 teaspoons baking powder
- 1/2 teaspoon salt
- juice and zest of one lemon, reserve 1 Tablespoon of lemon juice for the glaze
- 1/2 cup sour cream
- 1 cup confectioners sugar
- more lemon zest to sprinkle on top of cupcakes, I forgot this step!
Directions
Preheat your oven to 350 degrees. Grease or line the wells of a standard muffin tin and set aside. In a large bowl place the butter and sugar and beat until light and fluffy. Add the eggs, vanilla, lemon zest, and juice (reserving the ! tablespoon for the glaze) beat to combine. Add the flour, xanthan gum, baking powder and salt mix to combine. Add the sour cream to the batter and mix until just combined. The batter will be light and fluffy but not too thin.
Divide the mixture evenly among the muffin cups. Place into the center of your preheated oven and bake for about 20 minutes or until a toothpick inserted into the cupcakes comes out clean. Remove from the oven. Remove the cupcakes from the pan and cool on a baking rack allowing them to cool completely.
Once the cupcakes are cool, make the glaze. Place the confectioner’s sugar in a medium-size bowl and add about 1 1/2 teaspoons of the reserved lemon juice. Mix until you have a smooth and thick paste then add more lemon juice until you have a slightly thick but pourable glaze. Pour or spoon the glaze over the cupcakes once they have completely cooled. Sprinkle with lemon zest if desired.
Enjoy!
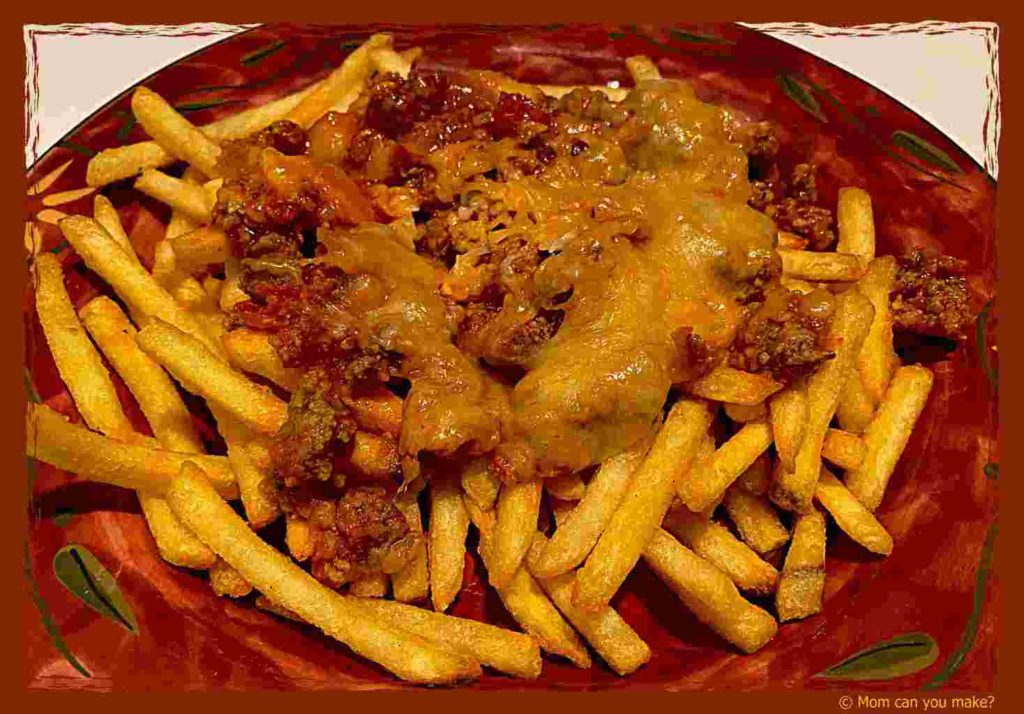
I saw the idea of pizza fries on Pinterest but changed it to what I had on hand for Robby to give this a go. One of the biggest things he misses the most while having to be gluten-free is a really good pizza. If you have never tried the frozen gluten-free pizzas from the store you are lucky. Cardboard would be a good alternative to those pizzas! The fries take the place of the crust. This worked really well as Robby enjoyed it. I’m not going to write this like I normally would as you can change this a million different ways with literally any pizza toppings you like.
The base of this is obviously the fries. Cook them as directed or air fry at 400 degrees for 10-12 minutes or to your desired doneness. For the topping, I used 1 pound of spicy crumbled sausage, chopped onion, and garlic. I sautéed these all together until the sausage was cooked through. I added 1/2 jar of pizza sauce to the pan to warm through. Finally, I added the shredded cheese to the top of the meat mixture. I let the cheese melt then added this mixture over the top of the fries.
Using a full bag of fries and the above measurements, it will feed a small army! Easily 6 people. Great for a small gathering or hungry teenagers. Add anything you would top a pizza with the combinations are endless. Keep in mind if you add lots of meats and veggies you may need a bit more pizza sauce. Put your creative hat on and make your own pizza fries!
Enjoy!

There was a hummus brand that made a roasted carrot hummus, however, I have not been able to find it. What’s a girl to do but make my own. This was delicious and could possibly be my favorite hummus yet! I served this with sliced veggies and Naan bread. I shared this dish with a friend and she really enjoyed it as well. So much so, she requested the recipe.
INGREDIENTS
- 1 can organic chickpeas
- 1 cup peeled, diced carrots
- 3 cloves of garlic
- 3-4 Tablespoons olive oil into the processor plus more for drizzling over veggies and garnish
- 2 Tablespoons tahini paste (sesame seed paste)
- 1 Tablespoon water
- 2 Tablespoons lemon juice
- 1 teaspoon hot sauce plus more to drizzle on the top (I used Cholula hot sauce)
- 1/4 teaspoon turmeric
- 1/4 teaspoon cumin
- 1/4 teaspoon sea salt
- 1/8 teaspoon cayenne pepper
- 1/4 cup roasted sunflower seeds (I found them already roasted and shelled in the grocery store)
- veggies and Naan bread for serving
DIRECTIONS
Preheat oven to 400 degrees. Spread the carrot slices and garlic cloves over a sheet pan that has been sprayed with non-stick spray. Drizzle olive oil over the vegetables and stir to coat them. Roast for 15-20 minutes. Allow to cool and remove skins from the garlic.
NOTE– This can also be done in an air fryer, air frying at 400 for 5-minute increments until the vegetables are soft.
Place all ingredients in a large food processor and process for a few minutes until you have the desired consistency. Scrape the processor sides down once or twice through this process. Remove to a serving dish, drizzle with olive oil, and more hot sauce if desired. Top with sunflower seeds.
Enjoy!


