Holidays
Christmas is over and we are all onto the New Year! I hope everyone had a relaxing and delicious Holiday as I know we did. We still have some activities planned with friends before the new year but it’s been nice to sit back and enjoy the season! This will be my last post before the New Year so I am wishing all of you a new year full of fun, joy, good health and delicious dishes!

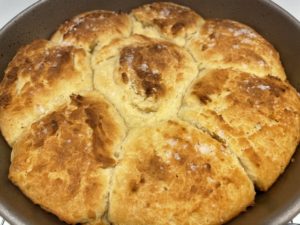
If you are gluten free you know how hard it is to find any kind of good bread, biscuit or roll. I have made attempts at making bread with little success but this dinner roll recipe comes out great each and every time. I make these for all of the Holidays for Robby now.
INGREDIENTS
3 cups gluten free all purpose flour …I use bob’s one for one that includes xantham gum. If your flour does not have xanthan gum you will need to add 1 1/2 teaspoons to your flour mix.
1 teaspoon salt
1 3/4 teaspoons rapid/instant yeast. I use Fleischmann’s brand
1 1/4 cups warm milk(110~115 degrees) I use fairlife milk
1/4 ups salted butter-I use Earth Balance, softened
2 eggs room temperature
1/2 cup of honey
1 teaspoon apple cider vinegar
2 Tablespoons unsalted butter, melted
Pinch of course sea salt
DIRECTIONS
I make this in my kitchen aide mixer with a dough hook but can easily be done In a Large bowl.
In a large bowl add the gluten free flour, salt, xanthan gum if using be sure not to add it if your flour already contains it.
Add the yeast into the GF flour by making a little well with your fingers in the flour and pour the yeast in the center of the well.
Warm the milk to 110 degrees- 115 degrees. I microwave the milk for about 1 minute 15 seconds the. Check the temperature with a quick read thermometer. If the milk is too hot it will kill the yeast.
Pour the warm milk over the yeast.
Add the softened butter, eggs, apple cider vinegar and honey to the bowl and mix until fully combined. 2-3 minutes. You may need to scape the bottom and sides of the bowl to be sure all of the flour is combined.
The dough will be sticky.
Spray a nine inch pie pan/cake pan with gluten free cooking spray.
Using an ice cream scoop sprayed with non stick spray place the dough balls around the pan and one in the center. Cover the pan with a kitchen towel and allow to rise in a warm place for 1 hour.
Pre heat your oven to 400 degrees.
Just before baking remove towel and brush the melted butter over the tops of the dough and sprinkle with a good pinch of sea salt . Bake the rolls on the middle rack for 14-16 minutes. They will be a nice golden brown but I do check mine early as my oven runs hot. You can check them with an instant read thermometer as the internal temp should be at 200 degrees.
Best when eaten warm but can be stored in an airtight container. Can be re heated in microwave for oven.
Enjoy!


This past weekend we met some friends for brunch at The Bedford Village Inn. We reserved one of the heated igloos and It was absolutely beautiful and the snow we got the night before really enhanced the Christmas feeling! It was warm and cozy from the fireplace heater they had going. We brought a blanket with us just in case but we did not need it, in fact we did not need our jackets either.

It was bright from the hanging chandelier.

We had a delightful waiter who was very attentive and personable. He recommended starting with freshly made pastries that they make daily along with the eggs Benedict or the blueberry pancakes. Who were we to complain with a basket of fresh made pastries!

There was also a blueberry muffin in there but I was slow in getting pictures as we were enjoying our company with Rick and Annmarie. Rick and Jim grew up together so we have Been friends for many years but sadly have not seen them in quite sometime until recently when they moved from California back to New Hampshire.

Our breakfast choice was very simple for all of us. We all funny enough decided on the Eggs Benedict with herb roasted potatoes on the side. The English muffin was not your average English muffin, we all agreed they must have been home made. The Canadian bacon was thinly sliced, the eggs were perfectly cooked with a runny center that covered the ham and English muffin. The hollandaise sauce was rich and creamy pulling the dish together perfectly. We all really enjoyed our choice, our waiter was spot on with his recommendations!

When reserving one of igloo’s there is a price separate for the igloo but ALSO a minimum order amount so be sure to check out The Bedford Village Inn website for information, reservations and cancellation policies prior to going. With that being said we did not meet the dollar amount so Jim and Rick both ordered the pork ramen to go. Annmarie ordered the flourless chocolate cake to go and I had the marble cheesecake to go. Needless to say I did not cook at all Sunday!

The ramen came beautifully packed as you can see. This had a savory pork and mushroom broth, pulled pork, smoked pork belly, vegetables, beet pickled egg, pickled shiitake and ramen noodles.

This dish was absolutely fantastic! Jim and Rick both LOVED it. I tried the broth and it was amazing, so much flavor! I don’t care for mushrooms so this is not a dish for me.
The marble cheesecake, oh that marble cheesecake…..just delicious. Marble cheesecake served with vanilla creme Anglaise, chocolate sauce and whipped cream. It was creamy, rich, velvety and down right delicious! My home plating did not do this cheesecake the justice it deserved!

This was the perfect time to enjoy The Bedford Village Inn , we took a quick walk through the Inn after our brunch as it was decorated beautifully with wreathes, Christmas Trees all about and a gorgeous fireplace glowing.

Everything about The Bedford Village Inn including our company was just perfect. Our time spent with Rick and Annmarie was priceless with so many laughs. Perfect way to start the day.
Visit The Bedford Village Inn website or Facebook page for more information and pricing.
Enjoy!
Wow! Christmas is here already, this month has flown by! This is the only time of year I do a lot of baking. I make several cookies plates for friends and neighbors and this year was no different. I always make dipped pretzels, Christmas bark with pistachios and dried cherries, bourbon balls but this year I added these grinch cookies and for our friends with dogs I added some bone broth gummies for the little fur babies!
These cookies were so easy as it’s starts with a packaged sugar cookie mix.

INGREDIENTS
1 package sugar cookie mix (about 17.5 ounce)
All of the ingredients called for on the sugar cookie package
Green food coloring
Green colored decorating sugar
Red heart cookie decorations
Hershey Kisses
DIRECTIONS
Heat oven to 375 degrees. Remove wrappers from chocolate kisses and set aside.
Mix cookies dough according to package directions. Add in a few drops of your green food coloring to get your desired color and mix well.
Shape dough into 1 inch balls and roll in colored sugar. Place on an ungreased cookie sheet about 2 inches apart.
Bake 7-9 minutes or until edges are lightly browned and the cookie is set. Remove from oven let cool just slightly. Put cookies on a cooling rack. Press a milk chocolate kiss in the center of each cookie. Add the heart. You can use a little baking gel icing if needed to help the heart stay.
Note-the chocolate kisses can get soft 9f added right out of the oven so it is best to let the cookie cool for just a minute or two.
Enjoy!
This recipe was on Pinterest.
And just like that Thanksgiving is over and Christmas is just around the corner! I am excited and ready for Christmas, our house is decorated, our cards are sent out, gifts for the grandkids have been sent and all
of my shopping is done. Time to sit back and enjoy the Holiday. With that being said I won’t have many posts between now and the new year. I’ll sneak in when I can with some holiday ideas.
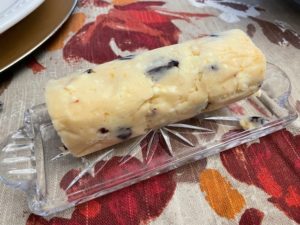
Today’s post is all about butter! My Thanksgiving and Christmas menu typically stays the same as they are recipes we absolutely love but every now and then I will change or add a side dish or an appetizer but this year I added this cranberry Honey Butter from Taste of Home. This butter will be added to our Holiday menu every year. It’s sweet, creamy and I love the cranberry in it. This really ads so much flavor to your dinner rolls! I will make it with dried cherries at Christmas.
This would also make a terrific Hostess gift. Package in small decorative containers and give it along with some baked scones or muffins!
INGREDIENTS
1 cup of butter, softened
1/3 cup of chopped dried cranberries or cherry’s
1/4 cup of honey
2 teaspoons orange zest
1/8 teaspoon kosher salt
DIRECTIONS
In a small bowl beat beat all of the ingredients until blended. Store in an airtight container in the fridge for up to 2 weeks.
Enjoy!
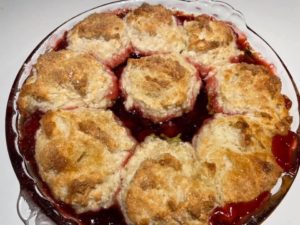
This was my favorite new recipe that I made through last years Thanksgiving and Christmas! This is so easy and so good warm just out of the oven with a scoop of vanilla ice cream. I was working on the blog and realized it was not posted yet! I have made this using canned cranberry sauce as well as homemade cranberry sauce, either way works great! This is sweet but not too sweet, if you have someone in your family that likes cherry pie they will enjoy this pie too!
This recipe is from Ree Drummond The Pioneer Woman on Food Network.
INGREDIENTS
1 1/2 cups canned cherry pie filling
1 1/2 cups cranberry sauce
1 1/3 cups all purpose flour
1 heaping Tablespoon granulated sugar
3 teaspoons baking powder
Pinch of salt
6 Tablespoons cold salted butter, cubed
3/4 cup buttermilk
Course sugar to sprinkle on top
DIRECTIONS
Pre heat oven to 375 degrees.
Mix together the cherry pie filling and the cranberry sauce in a bowl and transfer to a 9 inch pie plate.
Mix together the flour, granulated sugar, baking powder and salt in a bowl. Cut in the butter until it resembles tiny pebbles about 1 1/2 minutes. Mix in the buttermilk until it just comes together. It will be lumpy.
Drop 6-8 mounds of roughly 2 1/2 inch dough balls around the outside of the pie plate. Sprinkle the course sugar over the biscuit dough.
Bake until biscuits are golden and cooked through, about 30 minutes. Let cool ten minutes before serving.
Enjoy!
Stay In Touch


Follow me!
Recent Pins


