Holidays
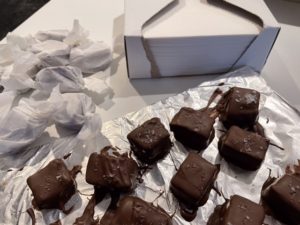
This candy recipe was an all time favorite food gift for everyone we shared them with over the holidays. I made several batches of the candy trying to get the proper pan size and the amounts just right. I also made two versions one with whiskey and one without. The candies were shared on holiday gift plates, with friends, family, fire department friends, military friends even a group of Military Generals! Each and every one came back to tell us how much they enjoyed them including the Generals!
This is a make ahead candy that needs to be in the freezer for 2 hours so plan ahead!
Makes 32 squares
INGREDIENTS
11 Oz. Bags of caramel bits (I buy them at Walmart, Kraft brand)
2 Tablespoons water
1/2 cup chopped pecans
1/2 cup chopped up pretzels
1 1/2 Tablespoons whiskey(can omit)
10 ounce package of chocolate flavored melting wafers such as ghirardelli
Course sea salt
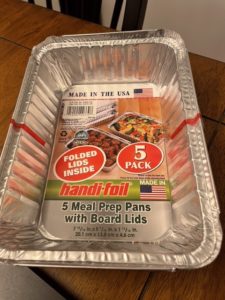
I used a disposable tin pan that I found at the grocery store size 7 15/16 x 6 7/16 x 1 13/16 or
a 5 1/2 x 9 baking dish also works.
I also used 5×5 squares of wax wrapping papers. You can easily cut wax paper to the proper size.
I also used Non stick aluminum foil and non stick spray
DIRECTIONS
Line your baking dish or aluminum tin with non stick foil, be sure to have the aluminum foil go up two of the sides of the dish. Spray with non stick spray. Set aside.
In a microwave safe bowl add the caramel bits and the 2 Tablespoons of water. Microwave for 2 minutes stirring occasionally. Once melted remove from the microwave and add the chopped pecans, chopped pretzels and whiskey. Stir to combine. Pour the mixture into the prepared pan. Place your baking dish into the freezer for 2 hours.
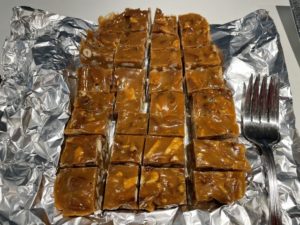
Remove from the freezer taking the caramel out of the baking dish using the aluminum foil wings. Remove the caramel from the aluminum foil and using a sharp knife cut the caramel into 32 equal pieces.
Line a baking sheet with non stick foil and set aside.
Melt your baking chips in a microwave safe dish. Microwave for 2 minutes stirring occasionally until completely melted. Remove from the microwave and dip your caramel pieces into the chocolate a couple at a time and place them on the foil lined baking sheet. Add a small pinch of sea salt directly after dipping them and continue this until all of your candy is coated in chocolate.
Let the chocolate firm in the refrigerator. Once firm remove from fridge and wrap in wax paper.
Enjoy!


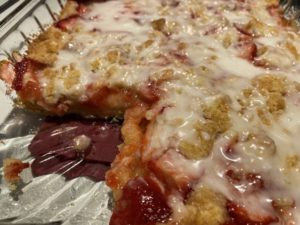
These Strawberry Cobbler Bars come from Ree Drummond the Pioneer Woman. I made these bars on Valentines weekend and let me say they were gone by the end of the weekend! They were absolutely delicious. Jim had one bar warm right out of the oven and a second one not much later. I loved the sweet lime icing on the top it added such a zing of flavor! I’ll be making these again for Easter!
INGREDIENTS
FILLING
3 cups chopped strawberries
1/4 cup granulated sugar
1 Tablespoon cornstarch
1 Lime, zested and juiced
CRUST AND TOP CRUMBLE
2 1/2 cups all purpose flour
2 1/2 sticks salted butter, cubed and chilled
1 cup packed brown sugar
1 Tablespoon baking powder
1/2 cup heavy cream
2 Tablespoons turbinado sugar
ICING
1 1/2 cups powdered sugar
2-3 Tablespoons fresh squeezed lime juice
DIRECTIONS
Pre heat oven to 375 degrees.
Add the strawberries , granulated sugar, cornstarch, lime zest and lime juice to a bowl. Toss to combine and set aside.
For the crust and crumble- in a food processor combine the flour, butter, brown sugar and baking powder. Pulse until a loose crumble is formed. Continue to pulse as you add the cream.
Spray a 9×13 pan with non stick spray. Dump 2/3 of the batter into the bottom of your baking dish and press flat forming the bottom crust. Top the bottom layer with the strawberry mixture, spreading it to make an even layer over the bottom. Sprinkle over the remaining crumb mixture followed by the turbinado sugar.
Bake the bars until the top is golden brown and the strawberry layer is thick and bubbling. 28-30 minutes.
Remove from oven, allow to cool.
For the icing , whisk together the powdered sugar and the lime juice until smooth. Once the cobbler has cooled drizzle the icing over the top.
Enjoy!
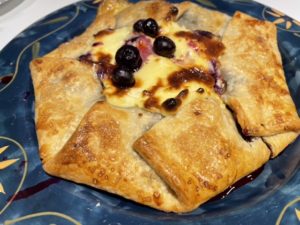
This is the second galette I made with the gifted pie crusts I received. Although we really liked this blueberry cheesecake galette it’s best eaten on the same day it’s made and I found that the cheesecake part of the topping got slightly browned while cooking so next time I may take a small piece of tin foil to cover the fruit and cheesecake part of the galette. Overall this was a very good dessert and reasonably easy to make!
Note- when I transferred the galette from the baking sheet to the plate a couple blueberries snuck out so I just placed them on the top!?
INGREDIENTS
1 pre made refrigerated pie crust
1 1/2 cups fresh blueberries
1/3 cup plus 2 Tablespoons granulated sugar
1 Tablespoon fresh lemon juice
4 teaspoons cornstarch
Pinch of salt
8 ounce package of cream cheese, softened
1 large egg, plus 1 yolk
2 Tablespoons of water
Coarse sugar for sprinkling
INSTRUCTIONS
Unroll the refrigerated pie dough and place it on a baking sheet that has been lined with parchment paper or tin foil.
To make your blueberry filling mix blueberries, 1/3 cup of sugar, lemon juice, cornstarch and salt in a bowl.
In a separate bowl make your cheesecake filling. Whisk together softened cream cheese, egg yolk and remaining sugar.
Spread half of the cream cheese mixture over the pie dough leaving a 1 1/2 inch border around the edge of the dough. Top with the blueberry mixture again leaving the border. Fold the pie dough crust partially over the filling. Spread the remaining cream cheese over the top of the blueberries and refrigerate for 30 minutes.
Pre heat oven to 425 degrees.
Brush the outer side of the dough with the beaten egg and water. Sprinkle with the corse sugar and bake for 20 minutes or until dough is cooked through and golden.
Enjoy!
This recipe can also be found on Pinterest.
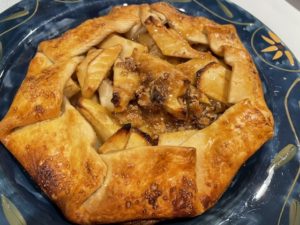
I have two Galette recipes for you this week. This one is my favorite one. it’s a quicker version of my caramel apple pie. A few days after Christmas we were at a friends for dinner and I was given two packages of pre made pie dough as our friends Christmas plans and menu changed due to the ice storm we had on Christmas Day. Our roads will filled with accident after accident, so many people changed or cancelled plans. So to not let the crusts go to waste I made two of these Caramel Apple Galettes, one for us and one for our friends! This would be great served with vanilla or caramel swirl ice cream.
INGREDIENTS
2 Granny Smith apples, peeled, cored and sliced
2 Tablespoon flour
1/2 teaspoon cinnamon
1/3 cup packed brown sugar
1/2 teaspoon vanilla
3 teaspoons fresh lemon juice
1/4 cup chopped pecans
Drizzle of caramel sauce
2 1/2 Tablespoons Raw sugar-course finishing sugar
1 egg
2 teaspoon water
DIRECTIONS
Heat oven to 425 degrees.
Line a baking sheet with tin foil. In a mixing bowl combine apple, flour, cinnamon, brown sugar, vanilla, lemon juice and pecans. Mix well to combine.
Lay the crust out on the lined baking sheet, mound the filling in the center of the crust leaving about 2 inch margin around the edge of the crust. Fold a section of the crust up partially covering the fruit, continue to do this around the entire galette.
Make an egg wash by mixing the egg and water together and brush the outside 0f the crust with the wash then sprinkle the raw sugar over the top of the egg wash. Bake for 20 or so minutes watching close as too not burn. Remove from oven and drizzle the top of the galette with your favorite caramel sauce. (The same kind you would put on ice cream)
Enjoy!
For many, many years now I have been making my own Chinese food for New Years Eve. I keep it very simple but this year I added a couple new recipes to my usual fried rice and egg rolls. I added as Asian ginger salad dressing to a simple salad along with the recipe I’m sharing today the Boneless Chinese Ribs. When our daughter Amanda was little she would always call them the “red things” so anytime we got Chinese take out we always made sure to order the red things for her! I think she still calls them that to this day!

This was my first time making them at home and I did make a couple changes to keep them gluten free for Robby and I did NOT add the food coloring to the sauce that gives them that red color that we all know. I can say this was super simple to make and we all enjoyed them. They are not quite the same as what you get from your favorite take out place but a great at home option.
INGREDIENTS
1.5 pounds boneless pork loin or boneless spare ribs. I used the loin
1/3 cup lite soy sauce
1/3 cup Hoisin sauce, I used gluten free but any will work
1/4 cup fry red wine
1 Tablespoon sugar
1/2 Tablespoon minced garlic
1/2 teaspoon of Chinese five spice
2 drops natural red food coloring, optional
DIRECTIONS
Thinly slice the pork into strips about 3 inches long and place in a large disposable plastic bag.
Whisk together the remaining ingredients in a small bowl until well combined and pour the marinade into the bag with the pork and allow to marinate in the fridge for at least four hours or up-to over night.
When ready to cook pre heat the oven to 350 degrees. Line a large baking sheet with tin foil and top with a baking rack.
Place the pork slices on top reserving the marinade. Depending on the size of your pork slices bake for 30 minutes or until cooked through.
Add the reserved marinade into a small sauce pan and bring to a boil. Reduce heat and simmer for ten minutes. Remove from heat.
When the pork is cooked through remove the pan from the oven and pour the sauce over the pork. Move the oven rack to the top portion of the oven and turn the oven to broil.
Put the pan back into the oven for just a couple minutes to get some of those crispy edges and the sauce carmalized. Keep an eye on them during this part as they will burn quickly. Remove from oven and serve.
Enjoy!


