Gluten free

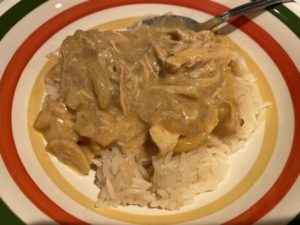
I wanted a quick and easy recipe using a rotisserie chicken that I picked up at the store and this recipe was perfect. I made this gluten free by using rice flour but you can use all purpose flour. This recipe turned out to be VERY forgiving as in my rush I added all of the broth into the pan instead of adding a small amount then the flour to thicken the sauce BUT to my surprise the sauce thickened nicely! That was a very happy surprise! I served this over rice but pasta would be delicious as well. Jim, Robby and I really enjoyed this dish. This will become a regular on my menu!
INGREDIENTS
1 rotisserie chicken, shed the chicken into pieces. Don’t add the skin
1 onion, chopped
1 Tablespoon olive oil
2 cups chicken stock
1/2 cup dairy free sour cream or regular
1 Tablespoon sweet paprika
1 teaspoon mustard powder
1/4 cup rice flour or all purpose
2 cloves of crushed garlic
Salt to taste
Pepper to taste
Cooked rice for serving/or pasta
DIRECTIONS
In a large skillet over medium heat add the olive oil, garlic and chopped onion. Cook until the garlic and onion have softened, about 5-6 minutes. Add the chicken stock into the pan along with the flour and let cook until you get the desired thickness, if it gets too thick simply add more stock. Add 3 cups of your cooked, shredded chicken. Add paprika, mustard powder and sour cream. Mix well. Add salt and pepper to taste. Once the chicken is warmed through remove from heat and serve warm.
Can be served over cooked rice as we did or over cooked pasta.
Enjoy!


We were in Searsport Maine not to long ago in our Motorhome. When we are traveling we always venture off to check out the surrounding area to see what we can find. We made our way into Belfast, Maine where we walked and browsed the local shops, after a few shops we wondered by Fon’s Kitchen Restaurant at 132 High Street, where Jim decided he was hungry enough to want to stop. So Jim, our pup Naz and I found a table outside. Naz and I enjoyed the warm summer day while Jim decided what he wanted for lunch.

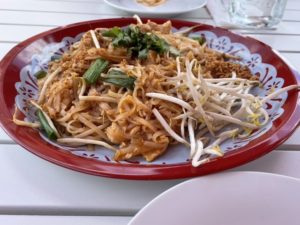
Fon’s kitchen serves Authentic Thai food, the chef is from Thailand. The menu has a nice variety of dishes and flavors, they have dishes that are gluten free as well as vegan dishes. For today Jim opted for the Chicken Pad Thai with stir fried rice noodles, egg, bean sprouts, peanuts and scallions. You can choose chicken, pork or tofu for this dish but Jim knew I would have some so he picked the chicken. Jim opted for the dinner size portion as he knew he would share some!
It was not long before the Chicken Pad Thai came out and Jim dove right in! The waitress was kind enough to bring an extra plate for me so I added a small amount to my plate but let me just say after just one bite I filled my plate a little more! We have both had this dish many times at many places but this was hands down the best Pad Thai I have ever tasted! We loved Fon’s Kitchen so much that while we were still eating lunch we’re talking about coming back before we continued onto the next part of our trip. When we got back to the campground we were speaking with another camper who mentioned she wanted to go into town to try Fon’s Kitchen, we had to laugh and told her about our experience, needless to say she made her way there!

Fon’s Kitchen is new to Belfast as they just opened March 31st of this year and they have certainly made a name for themselves. They are closed on Sunday’s, they have inside, outside seating as well as take out. Fon’s Kitchen has a web page as well as a Facebook page. They post their daily specials on Facebook as well as any updates they may have. If you like Thai food and find yourself in the Belfast, Maine area this is the place to go! You will not be disappointed.
Tomorrow’s post I’m taking you down to Well’s, Maine where I will introduce you to a young, adorable and up and coming chef named Samantha. Samantha made some delicious spring rolls, Crab Wontons and dipping sauce. You don’t want to miss this post.
Enjoy!

As soon as I saw this recipe on Pinterest I knew Robby would love it and boy was I right! This is made gluten and dairy free, but I’m sure you could make it with dairy ingredients and it would be just as tasty!
I used a boxed gluten free brownie mix from stonewall Kitchen as that’s the best we have found but use your favorite brownie mix.
This takes time to cool so it’s a perfect make ahead dessert.
I found this recipe at www.thenomadicfitzpatricks.com
INGREDIENTS
1 box of gluten free/ dairy free brownie mix along with ingredients listed on the box to make the brownies.
1 package gluten free Oreo’s
8 ounce container of dairy free cream cheese
1/4 cup dairy free sour cream
1/4 cup granulated sugar
1/2 teaspoon vanilla extract
2 eggs, lightly beaten for the cheesecake layer
INSTRUCTIONS
Preheat oven to 325 degrees. Grease an 8×8 pan or 9×9 pan and set aside.
Prepare the brownie mix according to the package BUT DO NOT BAKE! Once mixed pour the batter into the prepared pan. On top of the brownie mixture add a layer of the Oreo’s , about 16. You can also cut some of the Oreo’s in half to fill in any gaps. That is the Oreo layer.
In a separate bowl whisk the dairy free cream cheese, dairy free sour cream, sugar and vanilla. This will be thick. Whisk the two eggs in a bowl and add those to your cream cheese mixture and stir until smooth.
Pour this mixture over your Oreo layer and spread evenly with a spatula, thus is your cream cheese layer.
Lastly crush 4 Oreo cookies and sprinkle them over the top of the cheesecake layer.
Bake for 40-45 minutes or u til edges are slightly golden brown. Cool the brownies to room temperature for about an hour then chill in the fridge for an additional 2 hours before slicing and serving.
Keep stored in the fridge.
Enjoy!


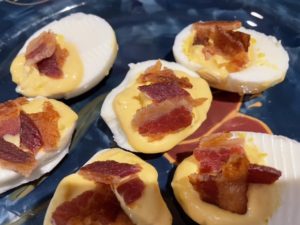
Robby recently went to Georgia to be with some friends and they went to Chik-Fil-A a few times And robby just raved about the sauce, he could not get enough of it. We don’t have Chick-Fil-A near us but luckily they sell their sauce at the grocery store. Needless to say I picked up a couple bottles for robby to have on hand. I have to admit we all love this sauce! (The original sauce) . It’s creamy and a little Smokey perfect for dipping, on a burger but I thought why not deviled eggs? Let me say these eggs were gone within five minutes of me finishing them! I’m not sure I will be allowed to make another deviled egg recipe!
These would be great for any of your summer picnics or just because! These may not be pretty but they are beyond tasty!
Recipe Can easily be doubled.
INGREDIENTS
5 hard boiled eggs
1/4 cup mayonnaise
1/4 cup Chik-Fil-A original sauce
Pinch of salt
Pinch of pepper
2 slices of cooked bacon, crumbled
DIRECTIONS
Slice your hard boiled eggs in half and remove the cooked yolks into a small bowl. When you have all of the yolks in the bowl I like to mash them with a fork until they are well broken up. I like my filling on the smooth side so I mash them well but it’s totally up to you. Once the yolks are mashed add the mayonnaise and the sauce. Add a pinch of salt and pepper and mix well. Using a piping bag or simply a zip lock bag as I do add the filling to the bag, snip the bottom if using a zip lock bag and fill the egg whites and top with crumbled bacon.
Enjoy!


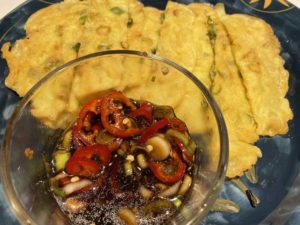
This is another dish Robby asked me to make when we got home. Although Robby does VERY well in the kitchen he was ready for me to cook after us being away for a few weeks and him working, going to school and taking care of our home. I was happy to make these for him BUT the sauce for these scallion pancakes was REALLY, REALLY spicy, too spicy for me but you can certainly tame it down by omitting the spicy red pepper and adding more honey.
These little pancakes took me a little time to brown but be patient as you want that little brown crisp!
Jim and Robby really enjoyed this dish and put it in the favorite category, if fact they were eating them faster than I could make them. I was not sure I was going to get a picture! Although I liked it, for me it was not a favorite, still good and would make again though!
Note-I mixed the scallions into the batter BUT next time I will keep the scallions out of the batter and sprinkle them over the batter just when I put the batter into the pan to make it easier to distribute the scallions into each bite.
INGREDIENTS
FOR THE BATTER
1 cup of water
1/2 cup white rice flour
1/2 cup tapioca starch or corn starch
2 eggs, beaten
1 teaspoon rice vinegar
Salt
Pepper
2 bunches of scallions, cleaned trimmed and diced.
FOR THE DIPPING SAUCE
2 Tablespoons Tamari
2 teaspoons rice vinegar
1 spicy red pepper-optional
1 scallion, diced
1 clove of garlic, diced
1/2 teaspoon toasted sesame oil
1/2 teaspoon sriracha
1/2 to 1 teaspoon of honey
Sesame seeds -optional
Coconut oil for the pan
DIRECTIONS
Prepare the dipping sauce by combing all of the ingredients and stir well to combine. Set aside to let the flavors come together.
For the batter add all of the ingredients together and mix well. Stir in the scallions and mix again. The batter will be very thin.
Warm a Tablespoon of coconut oil to a non stick pan over medium high heat. Once the oil is warm add about 1/4 cup of the batter to the pan. You can do 2-3 at a time depending on the size of your pan. If the scallions land in one spot simply using a spoon move them very gently so each bite gets some scallion in it. After a few minutes on one side flip to the other side. You want them golden brown. Continue until the batter has all been cooked.
Serve warm with dipping sauce.
Enjoy!


