Gluten free
This recipe has a few steps but they are well worth it. We ALL LOVED this dish. It’s sweet, spicy and crispy all in one bite. I used gluten free soft taco shells for Robby’s and a whole wheat soft taco shell for Jim’s. If you want it a little spicier add a bit more sriracha a little less spicy use a little less sriracha. If you don’t want to use corn starch rice flour would make a great substitute. This makes 4 wraps in total.
You could also serve the shrimp over white rice with an extra drizzle of sauce!

INGREDIENTS
Bang Bang SAUCE INGREDIENTS
1/2 cup mayonnaise
3 Tablespoons Thai sweet chili sauce
3 teaspoons sriracha sauce or to Tatse
FOR THE FILLING
Corn tortilla’s
1 package pre cut coleslaw package with coleslaw dressing
MARINADE FOR THE SHRIMP
1 Pound shrimp, peeled, deveined and tails off
1/2 cup buttermilk
Salt
Pepper
Dash of onion powder
Dash of garlic powder
3/4 cup cornstarch
Canola oil for frying
DIRECTIONS
For the shrimp marinade combine buttermilk, pinch of salt, pinch of pepper, onion powder and garlic powder. Pour over the peeled deveined and tail off shrimp stir to coat and set aside.
Heat about 2 inches of canola oil in a Dutch over, temperature should be 375 degrees.
In a small bowl stir together the bang bang sauce ingredients and set aside.
In another bowl add the coleslaw mix and coleslaw dressing mixing well and set aside.
Place the cornstarch in a shallow baking dish . Remove shrimp from the marinade mixture letting the excess marinade drip off and place the shrimp in the cornstarch coating both sides of the shrimp. When your oil is heated to temperature shake off any excess cornstarch and put into the heated oil. I did this in 2 batches.
Cook the shrimp until they are pink. Remove from oil onto a napkin lined plate to soak up excess oil.
Add the cooked shrimp into a bowl and add half of the Bang Bang sauce and stir to coat the shrimp.
To make the wrap, place your desired wrap on a plate, add some of the slaw mixture, add some of the cooked shrimp and drizzle with more Bang Bang sauce if desired.
Serve warm.
Enjoy!
Anne

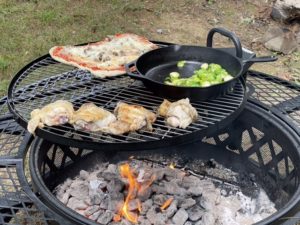
These roasted Asian spicy beans were such a great compliment to the Chinese Car Siu recipe, I roasted them in my cast iron pan right on the grill. I have baking instructions for you as well! This dinner came together so easy, I put Jim in charge of the grill and I made the fried rice on the stove top but I could have easily done the rice on the grill as well!
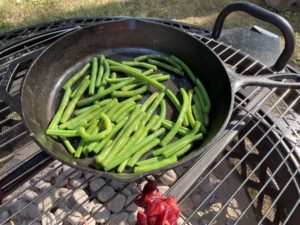
This picture is when we first put it on the grill as it cooks the beans will get lightly charred.
INGREDIENTS
1 pound fresh green beans, trimmed
1 Tablespoon sesame oil
Pinch of salt
Pinch of pepper
3 garlic cloves minced
1/4-1/2 teaspoon of red pepper flakes. We like it spicy so I used 1/2 teaspoon.
1 Tablespoon Tamari
2 teaspoons brown sugar
1/4 teaspoon ginger
Directions
In a medium bowl toss together all of the ingredients and mix well.
IF BAKING- pre heat oven to 425 degrees . Line a baking sheet with foil, spray with non stick spray. Layer the green beans in a single layer on your baking sheet and bake for 8-12 minutes or until the beans are tender.
FOR GRILLING-Add the green beans to a cast iron skillet and grill u see the beans are tender, mine took about 15 -20 minutes. This will depend on how hot your fire is.
When tender remove from oven or grill and serve warm.
Enjoy!

We love to grill no matter where we are, on the road or at home and this recipe became a HUGE family favorite the first time I made it. Robby loved it so much he asked me to make it each week for three weeks in a row!
Although we have eaten Chinese pork char Siu at our local Chinese restaurants I had never made any kind of char Siu recipe at home. When our Daughter Amanda was little she always called them the little red things, I think she still calls it that to this day! I’m looking forward to making this chicken version for her when we see her and her family in the spring!
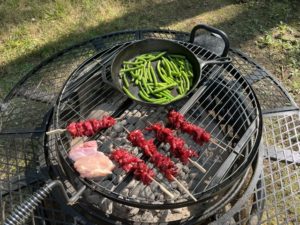
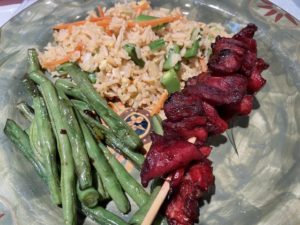
We made this with spicy roasted green beans (and easy fried rice that is already on the blog) that you will see in tomorrows post!
Note- this recipe uses beet powder that I ordered from Amazon. The beet powder gives the dish that bright red color that it’s known for. It does not change the flavor. I prefer this much more than adding the food coloring.
NOTE- this recipe marinated for 24 hours! Can marinate a shorter time if needed but the longer the better.
INGREDIENTS
1/4 cup brown sugar
1/4 cup honey
1/4 cup ketchup
1/4 cup Tamari sauce
3 Tablespoons beet powder
2 Tablespoons rice vinegar
1 Tablespoon gluten free hoisin sauce
1/2 teaspoon Chinese five spice powder
Pinch of salt
Pinch of pepper
2 1/2 pounds boneless skinless chicken thighs, cut into bite size pieces
Cooking spray
DIRECTIONS
In a large bowl mix together brown sugar, honey, ketchup, Tamari sauce, beet powder, rice vinegar, hoisin sauce, five spice powder, salt and pepper. Add your bite sized chicken pieces and mix well coating all of the chicken in that red sauce! Cover and refrigerate for 24 hours.
Soak your wooden skewers in water.
When ready to grill, heat your grill and spray with non stick spray.
Skewer the chicken pieces on your wooden or steel skewers. Place your skewers on your hot grill and Cook chicken until completely cooked through depending on how hot your grill is it will take 10-15 minutes turning occasionally.
Serve warm!
Enjoy!
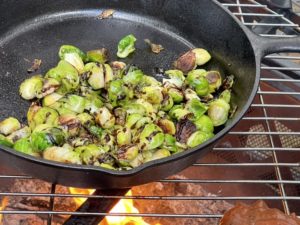
We have been doing a lot of cooking over our fire pit as it has an adjustable cooking grate. We have made pizza’s, chicken and these Brussel sprouts to just name a few things. The cooking time may differ depending on how hot your fire is. These can also be roasted in the oven!
INGREDIENTS
1 pound of Brussel sprouts, cleaned and halved
2 Tablespoons of vegetable oil
Pinch of salt
Pinch of pepper
Reduced balsamic vinegar, I buy the already reduced vinegar in the small bottles but you can easily reduce your own.
DIRECTIONS
Light the coals in the fire pit about 25-30 minutes before cooking.
Place the cleaned and halved Brussel sprouts in a cast iron pan. Drizzle with oil and sprinkle with salt and pepper. Mix to combine.
Add the pan to the grate on the fire pit and roast, stirring occasionally for 25-30 minutes or until desired doneness. Just before taking off the fire drizzle with reduced balsamic vinegar.
Serve warm.
Enjoy!
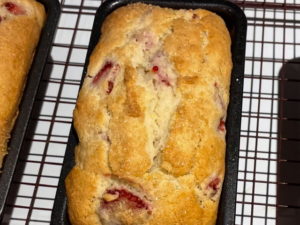
I came across this recipe on Pinterest from “The gluten free gathering” and I’m so glad I did! This bread is not only easy to make but it’s absolutely delicious! Jim, Robby and I devoured this bread. It was delicious warm from the oven or room temperature with a cup of coffee or tea!
I made this in 3 mini loaf tins as I usually share with friends and neighbors but no way did we share this, after one bite we all knew this lemon strawberry loaf was all ours!
INGREDIENTS
1/2 cup vegetable oil
1 cup granulated sugar
1 lemon , zested
1/4 cup fresh lemon juice, 1 large lemon
2 eggs
1/2 cup milk, I used fare life
2 cups gluten free flour, I used 1 for 1 that includes xanthan gum
2 teaspoons baking powder
1/4 teaspoon salt
1 cup of chopped strawberries
Sprinkle of raw sugar on the top if desired
Note-this would be great with a lemon drizzle on top. Powdered sugar mixed with lemon juice
DIRECTIONS
Pre heat oven to 350 degrees. Spray or line a 9×5 loaf pan or 3 mini loaf pans and set aside.
Zest the lemon into a large bowl, juice the lemon also adding it into the bowl. Add the oil and sugar to the bowl the. Add eggs one at a time and mix until smooth.
Add the milk and mix.
Add the gluten free flour, baking powder and salt mix until combined.
Add the chopped strawberries into a bowl with 1 teaspoon of gluten free flour, mix to coat the strawberries. This will keep the strawberries from going to the bottom of the loaf.
Fold the berries into the batter.
Pour the batter into your prepared loaf pan or pans.
Top with turbinado/raw sugar if desired.
Bake in the middle rack for 65-75 minutes if using a large loaf pan or 30 minutes if using the mini loaf pans. If you are making the larger loaf and the top starts getting to brown you can cover the loaf with tin foil.
Allow loaf to cool in pan for 30 minutes if using larger pan or 10 minutes using mini loaf pans.
Remove from pan and let cool on a wire rack.
Enjoy!
Stay In Touch


Follow me!
Recent Pins


