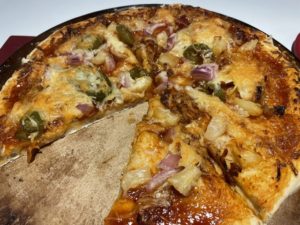
We absolutely love pizza nights! Sometimes it’s our usual favorite of spicy sausage with red onion or shrimp and asparagus with an Alfredo sauce but not this time! I had some BBQ pulled pork so I decided to use the leftovers for a pizza, we always make our pizza dough but any store bought works just fine then I added ….well, Jim added the BBQ sauce as the base then he added the pulled pork, red onion, pickled jalapeño’s, diced cooked bacon, pineapple tidbit and cheese. This became a family favorite after just one bite! It’s sweet, spicy and tangy all in one bite. So, so good!
NOTE-when we bake the pizza in the oven we use a pizza stone but when we grill the pizza we put the crust right on the grill grates. Follow the baking instructions for your particular dough.
I used left over pulled pork that I made but you can certainly buy it already made in the grocery store.
We did not measure amounts so I’m giving you approximate amounts, add topping’s to your liking!
INGREDIENTS
Dough for 1 pizza, home made or store bought
Your favorite BBQ sauce 1/4-1/2 cup
1/2 cup cooked BBQ pulled pork
1/2 small red onion-diced
1/4 cup pickled jalapenos
5 slices of cooked bacon-crumbled
1/4 -1/2 cup pineapple tidbits
1/2 cup of shredded cheese-we used mozzarella and cheddar
DIRECTIONS
Pre heat your oven according to the dough instructions.
Roll out the dough to your desired thickness, starting with the BBQ sauce, spread desired amount of sauce over the dough leaving 1/2 inch around the edge not covered with sauce. Add the pulled pork, red onion, jalapenos, cooked crumbled bacon, pineapple tidbits and lastly cover with desired cheese.
Bake according to dough instructions. Remove from oven and slice.
Enjoy!
Anne

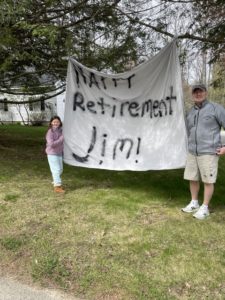
What a crazy couple of months we have had! So many celebrations all at once, Jim is retired after 36 years as an Army Pilot. We had a retirement ceremony in Concord N.H. With all of our family including our Daughter Amanda and her family who live in upstate N.Y. There was so much to be thankful for on that very special day!
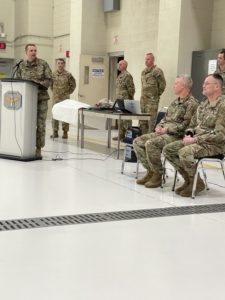
This was taken at the ceremony, Jim is on the far right.
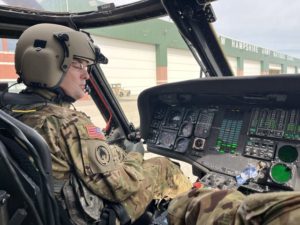
This was Jim’s very last flight in the Blackhawk helicopter. He flew this for many years including flying medivac in Iraq as well as in N.H. When he landed and taxied in the Concord fire department was there with water cannon’s being sprayed as he taxied underneath. It was an incredible sight.
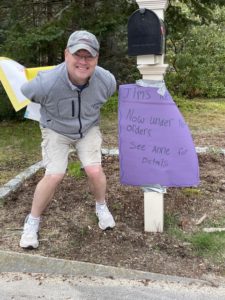
We came home and many of our neighbors had signs in front of their homes congratulating Jim for his service, we are so fortunate to have an amazing group of neighbors!

Our Grandkids getting ready to leave for the ceremony!
We did lots of celebrating that week including Easter with all of our family and then a couple of weeks after that we celebrated Birthdays. It has been an amazing and exhausting few weeks.
I need to move on as I can go on and on about our past couple months!
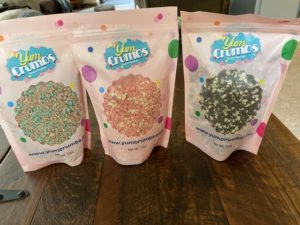
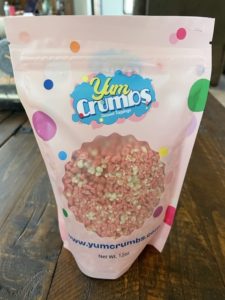
I recently came across the company Yum Crumbs that make the most delicious crumb topping. They Taste just like the ice cream bars with the strawberry crunch on them. The company makes several flavors, I purchased the strawberry shortcake, chocolate eclair and caramel apple to start. I just placed a second order for two gluten free flavors. I made these chocolate dipped strawberries a couple of times. Some I dipped in just the white chocolate but most of them got a dip in the strawberry shortcake yum crumb topping but I did not stop there, I made a few for one of our neighbors but I added a pipette filled with strawberry vodka into the dipped berries! The possibilities are endless with the various flavors. I’m seeing caramel dipped apples, cake toppings, pie topping….my mind is buzzing with so many things I can create!
INGREDIENTS
Strawberries
Ghirardelli melting chips, I used the white
Yum crumbs strawberry shortcake crumbs
DIRECTIONS
Simply melt the white chocolate chips according to package directions and dip the strawberries in the melted white chocolate then roll in the yum crumbs and place them on a foil covered baking sheet that has been sprayed with non stick spray and cool until set.
Enjoy!
Anne
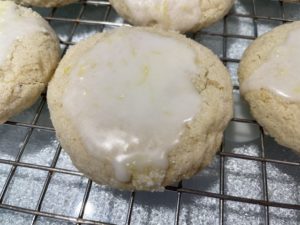
Spring is almost here but sadly it has not felt that way lately with all the snow storms that have been passing through! With another storm upon us and really wanting spring to be here sooner than later I decided to make some lemon sugar cookies. I made these gluten free but would be delicious using all purpose flour as well. The gluten eaters in the house enjoyed these as well, we had a house guest waiting out the storm with us so she could travel back to Virginia safely after the storm. We all agreed the tart frosting on the top really makes these cookies.
INGREDIENTS
1 1/2 cups gluten free flour I used Bob’s 1 for 1 baking flour
2 teaspoons baking powder
Pinch of salt
3/4 cup granulated sugar
1/2 cup unsalted butter at room temperature
1 large egg
1 teaspoon vanilla extract
1 Tablespoon fresh lemon juice
1 Tablespoon lemon zest
INGREDIENTS FOR ROLLING
1/4 cup sugar
1 teaspoon lemon zest
INGREDIENTS FOR THE GLAZE
1 cup powdered sugar
2 Tablespoon lemon juice
1 teaspoon lemon zest
DIRECTIONS
Pre heat oven to 340 degrees.
Spray your cookie sheets with non stick cooking spray and set aside.
In a medium bowl whisk together the gluten free flour, baking powder and salt. Set aside.
In another mixing bowl or in your stand mixer cream together the butter and granulated sugar for a couple of minutes, should be light and fluffy. Add the egg, lemon juice, lemon zest and vanilla extract. Mix until combined.
Add the dry ingredients and mix until just combined and there are no streaks of flour.
Scoop into 18 equal portions, I use a small cookie scoop for this but can be done by hand as well. You want them to be about the size of a ping pong ball.
In a small bowl mix together the ingredients for rolling. The granulated sugar and lemon zest. Roll the cookie dough balls completely into the sugar mixture and set them on the prepared cookie sheets 2 inches apart from each other. Spray the bottom of a glass with non stick spray and just slightly push the cookies down, not too flat though.
Bake at 340 degrees for 7-8 minutes until the edges are set and the top of the cookies are no longer shiny.
Let cool for 10-15 minutes before glazing.
To make the glaze combine the powdered sugar , lemon juice and lemon zest in a small bowl and stir until smooth. The glaze should be on the thicker side. Drizzle the glaze over the top of the cooled cookies and let the glaze set.
Enjoy!
Anne
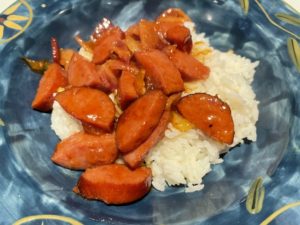
I’m still working with Tatse of Home magazine submitting and reviewing recipes and actually they featured me as their Community Cook of the month this month, I am thrilled to have been chosen. All of the community cooks are in a private facebook group and one of the other members posted this recipe and mentioned how much her family enjoyed it. I thought I would give it a try! I did change one thing by adding a full bottle of BBQ sauce instead of half as we like extra sauce for the rice. We really liked the spice you get from the red pepper flakes and horseradish. Easy dish with a little zip to it. I served it with jasmine rice.
Serves 6
INGREDIENTS
2 pounds smoked kielbasa-sausage halved lengthwise and cut into 1/4 inch slices
1/4 cup finely diced onion
3 bacon strips, chopped small
3/4 cup or more honey BBQ sauce
1/4 cup packed brown sugar
2 teaspoons minced garlic
1/2 teaspoon crushed red peppers
1 Tablespoons prepared horseradish
Hot cooked rice for serving.
DIRECTIONS
In a Dutch oven sauté the bacon pieces until almost all the way cooked through, add the kielbasa and onion and sauté until the onion is tender. Add the BBQ sauce, brown sugar, horseradish, garlic and red pepper flakes. Bring to a boil and mix to combine. Cook for 2-3 more minutes and remove from heat.
Serve warm over cooked rice.
Enjoy!
Anne
Walking taco’s have been around for a long time but somehow I have not posted any of the many choices to make them. This recipe I made into a casserole but the original walking taco’s were made in individual chip bags using Fritos, Doritos or tortilla chips. You slightly crush the chips up and add your cooked taco meat, cheese and your favorite toppings and dig in! Easy and portable, the kids always love these!
I made this into an 8×8 casserole dish and to show you how versatile this dish is, all I had on hand was the BBQ frito chips so I used those and let everyone add whatever toppings they liked. The picture does not do the dinner justice , trust me it was very good!
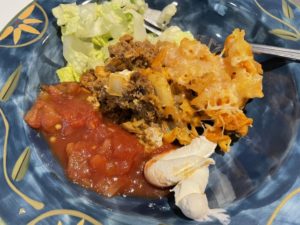
INGREDIENTS
1 pound ground beef
1 cup of diced onion (I used half of a large onion)
3 ounces cream cheese
1 packet taco seasoning-I used gluten free
1 can diced green chilis, I used mild
2-3 cups lightly crushed corn chips, Doritos or tortilla chips
1 cup shredded cheese, Mexican blend or Monterey Jack
1 Roma tomato, chopped-for serving
Shredded lettuce-for serving
Salsa-for serving
Sour cream-for serving
DIRECTIONS
Pre heat oven to 350 degrees. Spray an 8×8 casserole dish with non stick spray and set aside.
In a large skillet over medium high heat add the ground beef and cook crumbling it as it browns. Drain the fat from the pan and add the onions and the seasoning packet following the directions on the back. Once the beef is cooked through add the diced green chili sand cream cheese to the skillet and sauté til the cream cheese mixture is incorporated and combined in the beef mixture. Pour this mixture into your prepared pan and top with crushed chips and cheese.
Bake for 15 minutes, remove from oven and serve with diced tomato, salsa, shredded lettuce and sour cream if desired.
Enjoy!
Anne
Stay In Touch


Follow me!


