Gluten free
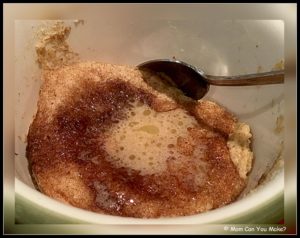
I came across this single serving microwave cake on Pinterest and I had my doubts, BUT Robby really loved this sweet dessert. One of his all-time favorite things are cinnamon rolls but having those belly issues lately that I have mentioned, has changed his diet to a gluten free one for now. As you can imagine this has been a roller coaster for me trying to meet all of his restrictive needs but that’s why I am so thrilled he loves this as I can make it in under five minutes and he gets all of his favorite flavors! Win, win!
NOTE – the recipe I found called for this to bake in the microwave for one minute but my cake took over one minute thirty seconds. So depending on your microwave, times may vary.
INGREDIENTS
1 scoop vanilla protein powder (use the scoop that comes in the powder)
1/2 teaspoon baking powder
1 Tablespoon coconut flour
1/2 teaspoon cinnamon
1 Tablespoon granulated sugar
1 large egg
1/4 cup unsweetened almond milk
1/4 teaspoon vanilla
1 teaspoon granulated sugar for the top
1/2 teaspoon cinnamon for the top
GLAZE
1 Tablespoon butter or coconut butter, melted
1/2 teaspoon almond milk
Pinch of cinnamon
DIRECTIONS
Grease a microwave safe bowl with cooking spray. Add the protein powder, baking powder, coconut flour, cinnamon and 1 Tablespoon of sugar. Mix well. Add the egg and mix into the dry mixture. Add the milk and vanilla mixing well. Batter will be thick, add a slight amount more milk if needed. Mix together the sugar and cinnamon for the top and sprinkle over the batter. Microwave between 1-2 minutes until the middle is cooked through, you will see the edges slightly pull away from the bowl. Mix the glaze together and drizzle over the top of the cake.
Enjoy!

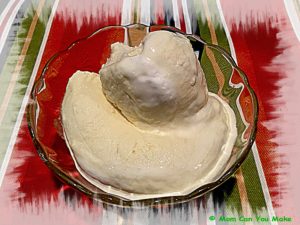 A two ingredient delicious recipe? Yes! And it’s so good on a hot summer day! It is a gluten free recipe but it really makes no difference as this is so tasty gluten or not! It’s also crazy easy. It just takes some time in the freezer. Everyone in the house enjoyed this cold pineapple whip! I think this would also work well with frozen strawberries or any other frozen fruit. I think the method used here is the important part. It does take a little bit of time to incorporate the fluff into the mixed fruit, but give it a little bit of time it does come together!
INGREDIENTS
16 ounces frozen pineapple pieces
14 ounce tub of store bought marshmallow fluff
DIRECTIONS
Divide the pineapple pieces into two equal portions. Leave one portion frozen and defrost the other half either by allowing it to sit at room temperature or placing it in the microwave on low power until cold, but not frozen. Place the defrosted portion in a blender or food processor and process until smooth. Add about 1/4 cup of marshmallow fluff and the frozen pineapple to the blender and process until the pineapple is smooth. If necessary add a little more fluff and continue to process.
Transfer the pineapple mixture to a large bowl, add the remaining marshmallow fluff and mix to combine. The mixture will turn to a light yellow color.
FOR A SCOOPABLE CONSISTENCY
Transfer the mixture into a freezer safe container with a tight fitting lid and place in the freezer for at least 6 hours or overnight. If frozen for longer than 12 hours, leave the container out for about ten minutes until scoopable.
FOR SOFT SERVE CONSISTENCY
Transfer the mixture to a large Ziploc bag, fill with the mixture and close the top, place the bag in the freezer for about 4 hours or until mostly firm. Snip off the bottom corner of the bag and pipe into bowls.
Serve immediately. It will melt quick!
Enjoy!

This recipe can be found at www.glutenfreeonashoestring.com
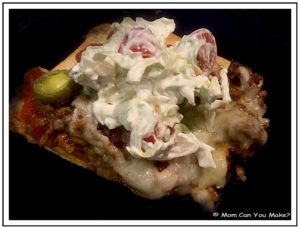
One of our favorite pizza places in Portsmouth, NH has our favorite Mexican pizza but we don’t always have time to go into Portsmouth so what’s a girl to do? Make my own version right? Well, this is not exactly like the restaurant version and it is definitely a little spicier, but the cool lettuce and tomato slaw on top cools it right down. You can also change the spice level by using mild salsa and leaving the jalapeño’s off. I made this one Saturday afternoon and shortly after I made it we had some neighbors pop over so I was thrilled to see how they liked it. I did not tell them it was my creation before they ate it so I was thrilled when they both cleaned their plates and said how much they liked it! I knew Jim and I liked it but it’s nice to have some additional feedback. I also made a gluten free version for Robby using gluten free crust and gluten free taco seasoning. Robby loved his pizza too! If you want to keep it dairy free, don’t use the sour cream and use dairy free cheese.
INGREDIENTS
Pizza crust of your choice, store bought, home made or dough from your favorite pizza place
1/2 pound ground beef
2 Tablespoons of taco seasoning, I use low sodium
3 Tablspoons water
1/2 cup of salsa, I used medium spice
1/2 cup shredded Monterey Jack cheese
1/2 cup shredded cheddar cheese
1/4 – 1/2 cup jarred sliced pickled jalapeños, depending on how much you want
TOPPING ingredients
1 cup shredded lettuce
1 cup cherry tomatoes, halved
1 cup sour cream
FOR A GLUTEN FREE PIZZA – like this one
Use a gluten free crust and gluten free taco seasoning. To make this dairy free leave out the sour cream and use dairy free cheese.
DIRECTIONS
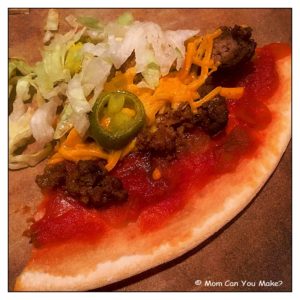
Preheat oven to 450 degrees. Lightly spray sheet pan with non-stick spray. Flatten the dough forming your crust. Prebake the crust for 3-4 minutes partially baking it. Remove from oven. In the meantime, heat a skillet to medium heat and add your ground beef. Cook ground beef breaking into crumbs as it cooks, drain excess liquid from the pan and add the taco seasoning and water, mix to combine and finish cooking. When cooked through, remove from heat.
To assemble, add your salsa to the top of your pizza crust and spread to about 1/4 of and inch to the edges, add the ground beef mixture and cover the salsa, add the cheeses spreading over the beef. If desired add the sliced jalapeños. Place back in the oven and bake an additional 8 minutes.
While the pizza is baking combine all of the topping ingredients together and set aside. When pizza is cooked through remove from oven, let rest for just a couple minutes, slice and add a spoonful or so of the topping. Serve warm.
Enjoy!


This review is going to be a little different as I will be focusing on the gluten free menu. As I have mentioned Robby has had some gut issues and going gluten free has helped. Not only I am learning about gluten free diets, I’m also checking out restaurants that have gluten free options. I first heard about Green Leaves from my niece Becky, so I knew it would be good. The difficult thing was that it was in York, Maine about 20-25 minutes away. Not super easy to do a take out order, but I found myself in York last week meeting a friend and thought it would be the perfect time to check it out.
When I was with my friend, Amanda, I asked her if she had been to Green Leaves. “Yes, it’s a York favorite” she said. She and her family all love it! After hearing that, I knew I had to stop in and grab some take out for Robby and I.
Green Leaves Chinese Restaurant and Lounge is located in the Meadowbrook Village Plaza on Route 1 in York, Maine. It was about 1:30 in the afternoon on a Wednesday and I thought I would be in and out in no time. Boy, was I wrong this place was packed! The dining and lounge were almost completely filled with people and the To Go orders lined up on the counter! Wow! That was a crazy first impression. I got to the counter and asked for the gluten free menu and I was handed the menu from Andy, the owner. Andy was a super nice guy and said people come from all over for that menu. I explained I was one of those people too! He told me that when he remodeled his kitchen he put in two kitchens to be able to offer “certified” gluten free food. How amazing! I’m still learning about gluten free, but I know there are three things to look for. Gluten Removed, Gluten Free and Certified Gluten Free. The safest is the Certified Gluten Free, so I felt really good about Green Leaves.
I ordered two items from the gluten free Chef’s Special part of the menu. I ordered Crispy Beef with Broccoli and Sweet and Sour Chicken. These dishes do not come with a side of rice so if you want a side dish you need to order that as well. I ordered the vegetable fried rice for Robby and I to share.
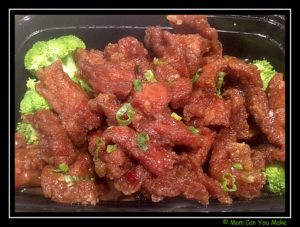
Let’s start with the Crispy Beef and Broccoli ($11.95) this was my favorite dish. The beef…even after driving home for 20 minutes was still crisp but it was so juicy and tender. One of the best crispy beef dishes I have ever had, gluten free or not! Excellent dish!
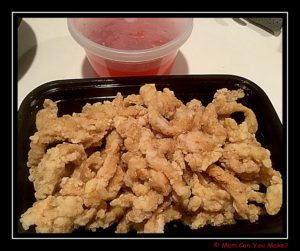
Next up was the Sweet and Sour Chicken ($10.95) I was a bit nervous with this hoping that they did not put the sauce on the chicken. For a take out order, you can see they do not! See those crispy bites of chicken? Yup still crispy but, Green Leaves has been voted the best Chinese restaurant in York County for 20 years in a row and counting!
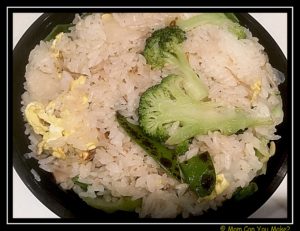
Last but not least was the vegetable fried rice ($7.95) . First I should mention the portion was big, more than enough for Robby and I. We had some leftovers for the next day! The rice had plenty of vegetables, broccoli and mushrooms galore! Over all everything we had was terrific and worth the drive. This is a place we would go to anytime we are in the area with or without our gluten free guy Robby!
This is only a small glimpse of what the gluten free menu has. They have a sushi menu, lunch specials, a chef’s special menu that includes what we ordered along with coconut chicken or shrimp, General Tso’s chicken or shrimp, shrimp with walnut and salt and pepper chicken to just name a few things!
They have a number of fried rice options, chop suey choices, soups like chicken and rice, egg drop and hot and sour! The stir fry section of the menu is huge! All with chicken, shrimp and seafood choices. This gluten free menu goes all the way to dessert, things like green tea ice cream, fried banana’s, and mango mousse cake!
I have only given you a small glimpse of what Green Leaves has to offer from the gluten free menu. The non-gluten free menu is even bigger! Green Leaves opens daily at 11 am and you can also checkout their website. http://www.greenleavesrestaurant.com/
NOTE – Robby and I did not come close to finishing either dish so I have learned that the best way to re-heat Chinese food (or pizza and seafood) is to place the leftover’s on a foil covered baking sheet. Place the baking sheet in a COLD oven. Turn the oven to 330 degrees and when the oven bell rings to say the oven is heated, that’s when you take the sheet pan out and enjoy your leftovers! I kept the sauce from the sweet and sour chicken separate and just heated that in the microwave!
Take some time out this summer and stop in and see Andy at Green Leaves!
Enjoy!

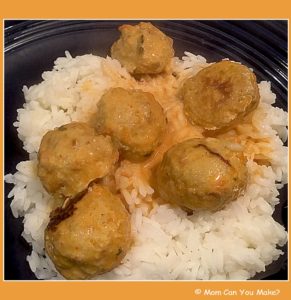
These meatballs came together fairly quickly and the sauce was delicious, creamy smooth and full of flavor. Although Jim and I both agreed the meatballs were very good, the next time I make this I am going to roast some shrimp and add that to the sauce instead of the chicken meatballs. I served this over rice keeping it gluten free for Robby, but you can certainly serve this over pasta as well.
INGREDIENTS
1/2 cup roughly chopped carrots
1/4 cup red onion, chopped
1/2 to 1 Tablespoon dried cilantro (I used 1/2 T)
Juice of one lime
2 Tablespoons fresh basil
1 Tablespoon low sodium soy sauce
1 teaspoon ginger
1 clove garlic
1/2 teaspoon cumin
1/4 teaspoon red chili flakes
Salt
Pepper
1 pound ground chicken
SAUCE INGREDIENTS
1 can coconut milk
1 Tablespoon red curry paste
1 Tablespoon almond butter
2 Tablespoons lime juice
1 teaspoon minced garlic
Rice or pasta to serve
DIRECTIONS
Preheat oven to 400 degrees. Place all of the meatball ingredients except the ground chicken in a blender or food processor and pulse until chopped. In a large bowl add the ground chicken and the ingredients from the blender, mix until combined. Roll the meat mixture into about 1 1/2 inch balls and place them on a lined baking sheet. Bake for 20 minutes, roll the balls over and continue baking for an additional 10 minutes.
For the sauce – in a large skillet over medium heat add the coconut milk, add the rest of the sauce ingredients and simmer for ten minutes stirring constantly. Add the meatballs to the sauce coating them and serve over rice or pasta.
Enjoy!

This recipe can be found at www.thebewitchinkitchen.com


