Dessert
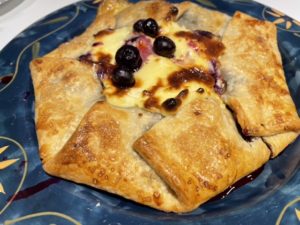
This is the second galette I made with the gifted pie crusts I received. Although we really liked this blueberry cheesecake galette it’s best eaten on the same day it’s made and I found that the cheesecake part of the topping got slightly browned while cooking so next time I may take a small piece of tin foil to cover the fruit and cheesecake part of the galette. Overall this was a very good dessert and reasonably easy to make!
Note- when I transferred the galette from the baking sheet to the plate a couple blueberries snuck out so I just placed them on the top!?
INGREDIENTS
1 pre made refrigerated pie crust
1 1/2 cups fresh blueberries
1/3 cup plus 2 Tablespoons granulated sugar
1 Tablespoon fresh lemon juice
4 teaspoons cornstarch
Pinch of salt
8 ounce package of cream cheese, softened
1 large egg, plus 1 yolk
2 Tablespoons of water
Coarse sugar for sprinkling
INSTRUCTIONS
Unroll the refrigerated pie dough and place it on a baking sheet that has been lined with parchment paper or tin foil.
To make your blueberry filling mix blueberries, 1/3 cup of sugar, lemon juice, cornstarch and salt in a bowl.
In a separate bowl make your cheesecake filling. Whisk together softened cream cheese, egg yolk and remaining sugar.
Spread half of the cream cheese mixture over the pie dough leaving a 1 1/2 inch border around the edge of the dough. Top with the blueberry mixture again leaving the border. Fold the pie dough crust partially over the filling. Spread the remaining cream cheese over the top of the blueberries and refrigerate for 30 minutes.
Pre heat oven to 425 degrees.
Brush the outer side of the dough with the beaten egg and water. Sprinkle with the corse sugar and bake for 20 minutes or until dough is cooked through and golden.
Enjoy!

This recipe can also be found on Pinterest.
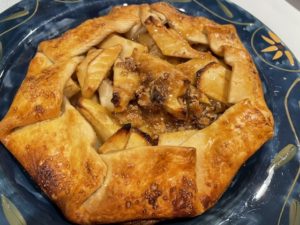
I have two Galette recipes for you this week. This one is my favorite one. it’s a quicker version of my caramel apple pie. A few days after Christmas we were at a friends for dinner and I was given two packages of pre made pie dough as our friends Christmas plans and menu changed due to the ice storm we had on Christmas Day. Our roads will filled with accident after accident, so many people changed or cancelled plans. So to not let the crusts go to waste I made two of these Caramel Apple Galettes, one for us and one for our friends! This would be great served with vanilla or caramel swirl ice cream.
INGREDIENTS
2 Granny Smith apples, peeled, cored and sliced
2 Tablespoon flour
1/2 teaspoon cinnamon
1/3 cup packed brown sugar
1/2 teaspoon vanilla
3 teaspoons fresh lemon juice
1/4 cup chopped pecans
Drizzle of caramel sauce
2 1/2 Tablespoons Raw sugar-course finishing sugar
1 egg
2 teaspoon water
DIRECTIONS
Heat oven to 425 degrees.
Line a baking sheet with tin foil. In a mixing bowl combine apple, flour, cinnamon, brown sugar, vanilla, lemon juice and pecans. Mix well to combine.
Lay the crust out on the lined baking sheet, mound the filling in the center of the crust leaving about 2 inch margin around the edge of the crust. Fold a section of the crust up partially covering the fruit, continue to do this around the entire galette.
Make an egg wash by mixing the egg and water together and brush the outside 0f the crust with the wash then sprinkle the raw sugar over the top of the egg wash. Bake for 20 or so minutes watching close as too not burn. Remove from oven and drizzle the top of the galette with your favorite caramel sauce. (The same kind you would put on ice cream)
Enjoy!

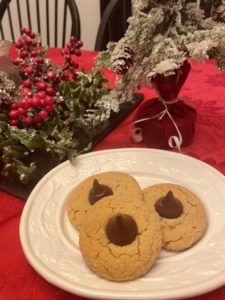
When it comes to gluten free cooking and baking I refer to Momma Knows Gluten Free quite often. This is one of her recipes and it’s delicious! Finding really tasty gluten free recipes for Robby is always a challenge but this one is one I will be making anytime of the year! I always try and have some desserts around for Robby especially now with all of the baking and cookie exchanges happening. This is a cookie that even the gluten eaters will like!
INGREDIENTS
1/2 cup gluten free peanut butter
1/2 cup granulated sugar
1/2 cup brown sugar, packed
1/2 cup unsalted butter, softened (I used smart balance)
1 teaspoon molasses
1 egg, room temperature
1 1/4 cups gluten free all purpose flour, I used Bob’s 1 for1 that includes xanthan gum
3/4 teaspoon baking soda
1/2 teaspoon gluten free baking powder
1/4 cup granulated sugar for rolling
Hershey kisses, unwrapped
DIRECTIONS
Add the granulated sugar, brown sugar, butter and peanut butter to a large bowl and mix with your mixer until fully combined and creamy.
Mix in the egg and molasses. Mix until fully combined.
In a medium bowl add the flour, baking soda, baking powder and whisk to combine, slowly pour the mixture into the batter and mix until fully combined. The cookie dough will be soft.
Cover the cookie dough and refrigerate for 30 minutes.
Preheat oven to 375 degrees. Add the 1/4 cup of granulated sugar to a small bowl to roll the dough in to.
Scoop 1 Tablespoon of dough and roll into a ball. Roll the ball into the sugar and place on a greased baking sheet.
Bake 10-12 minutes or until lightly browned on the edges.
As soon as you take the cookies out of the oven place the Hershey kiss in the center of each cookie and slightly push down. Allow to cool completely on a cooling rack. Store in an air tight container.
Enjoy!

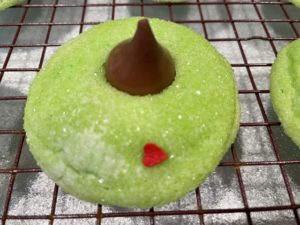
Wow! Christmas is here already, this month has flown by! This is the only time of year I do a lot of baking. I make several cookies plates for friends and neighbors and this year was no different. I always make dipped pretzels, Christmas bark with pistachios and dried cherries, bourbon balls but this year I added these grinch cookies and for our friends with dogs I added some bone broth gummies for the little fur babies!
These cookies were so easy as it’s starts with a packaged sugar cookie mix.
INGREDIENTS
1 package sugar cookie mix (about 17.5 ounce)
All of the ingredients called for on the sugar cookie package
Green food coloring
Green colored decorating sugar
Red heart cookie decorations
Hershey Kisses
DIRECTIONS
Heat oven to 375 degrees. Remove wrappers from chocolate kisses and set aside.
Mix cookies dough according to package directions. Add in a few drops of your green food coloring to get your desired color and mix well.
Shape dough into 1 inch balls and roll in colored sugar. Place on an ungreased cookie sheet about 2 inches apart.
Bake 7-9 minutes or until edges are lightly browned and the cookie is set. Remove from oven let cool just slightly. Put cookies on a cooling rack. Press a milk chocolate kiss in the center of each cookie. Add the heart. You can use a little baking gel icing if needed to help the heart stay.
Note-the chocolate kisses can get soft 9f added right out of the oven so it is best to let the cookie cool for just a minute or two.
Enjoy!

This recipe was on Pinterest.
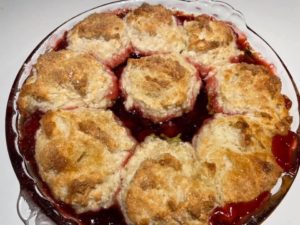
This was my favorite new recipe that I made through last years Thanksgiving and Christmas! This is so easy and so good warm just out of the oven with a scoop of vanilla ice cream. I was working on the blog and realized it was not posted yet! I have made this using canned cranberry sauce as well as homemade cranberry sauce, either way works great! This is sweet but not too sweet, if you have someone in your family that likes cherry pie they will enjoy this pie too!
This recipe is from Ree Drummond The Pioneer Woman on Food Network.
INGREDIENTS
1 1/2 cups canned cherry pie filling
1 1/2 cups cranberry sauce
1 1/3 cups all purpose flour
1 heaping Tablespoon granulated sugar
3 teaspoons baking powder
Pinch of salt
6 Tablespoons cold salted butter, cubed
3/4 cup buttermilk
Course sugar to sprinkle on top
DIRECTIONS
Pre heat oven to 375 degrees.
Mix together the cherry pie filling and the cranberry sauce in a bowl and transfer to a 9 inch pie plate.
Mix together the flour, granulated sugar, baking powder and salt in a bowl. Cut in the butter until it resembles tiny pebbles about 1 1/2 minutes. Mix in the buttermilk until it just comes together. It will be lumpy.
Drop 6-8 mounds of roughly 2 1/2 inch dough balls around the outside of the pie plate. Sprinkle the course sugar over the biscuit dough.
Bake until biscuits are golden and cooked through, about 30 minutes. Let cool ten minutes before serving.
Enjoy!


