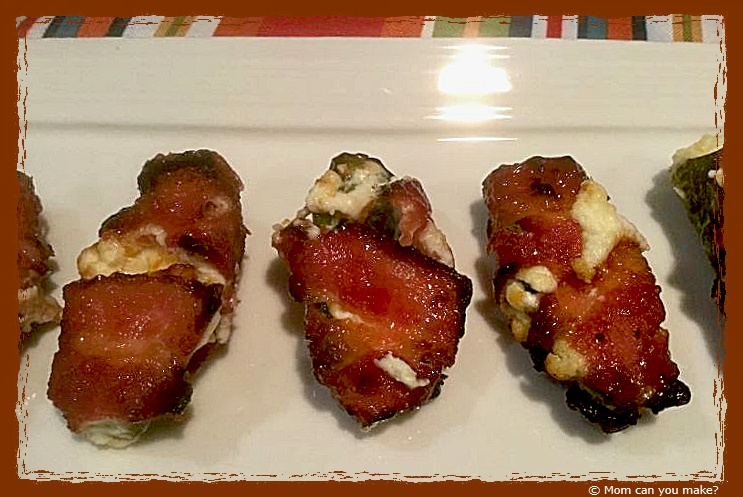
We absolutely LOVE jalapeño poppers. I make them often and we also order them when we are out. I usually stuff them with spicy sausage but decided to change it up a bit with some seasoning in the cream cheese mixture and the addition of the sweet barbecue sauce. I used my air fryer but you can easily bake these as well. This was the perfect sweet and spicy combination, these just might be my all-time favorite jalapeño poppers. We loved them so much I made them two days in a row with none left over!
INGREDIENTS
- 8 jalapeño’s
- 4 ounces of cream cheese at room temperature
- 1/2 cup sharpe cheddar cheese, shredded
- 1/2 cup Monterey Jack cheese, shredded
- 1 teaspoon garlic powder
- 1 teaspoon onion powder
- 8 slices thick cut bacon
- 1/2 cup of honey BBQ sauce
- 1/4 cup packed brown sugar
Preheat your air fryer to 400 degrees. Slice each jalapeño in half lengthwise and remove the seeds and veins. Set aside. In a small bowl combine the cream cheese, cheddar cheese, Monterey Jack cheese, garlic powder, and onion powder and mix well. Spread the cream cheese mixture into the body of each jalapeño half. Cut the bacon slices in half and taking one piece of bacon at a time wrap the half piece of bacon around one of the stuffed jalapeños and secure each end with a toothpick. Do this for each jalapeño half.
In another small bowl combine the barbecue sauce and brown sugar. Brush each of the bacon wrapped jalapeños with the barbecue mixture. Place the jalapeños in your fryer in a single layer and air fry at 400 degrees for 12-14 minutes depending on how crispy you want your bacon. Remove from fryer and let cool for just a couple minutes. Serve warm.
Enjoy!


Valentine’s Day is just around the corner. If you want to bake up some sweet treats for the little ones or loved ones in your life this just might what you are looking for! If you have
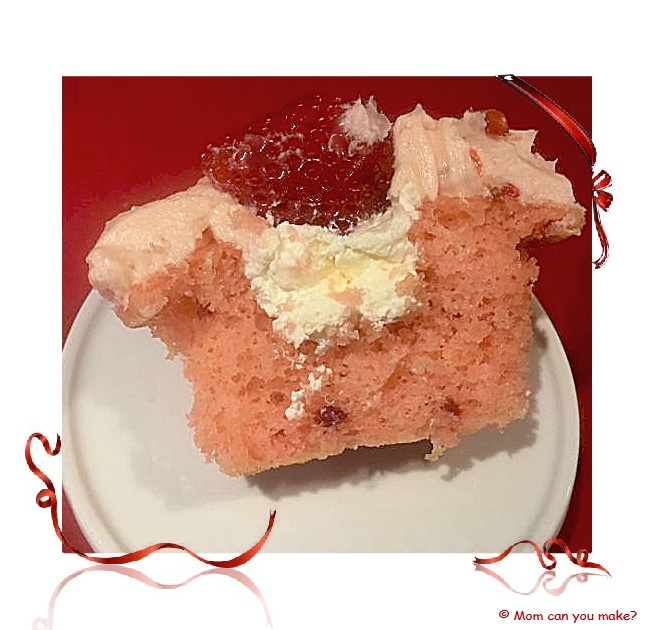
When I was deciding what to make for some Valentine’s Day fun I thought of all of Miss. B’s creations and decided on cupcakes. Keeping Miss. B in mind I did not want just any old cupcake so I decided on this strawberry cheesecake version. Are you impressed? This cupcake does take a little bit of time but I can promise you they are well worth it! I shared these cupcakes with our local fire department and one of the guys said he would cheat on his diet for one of these!
Ingredients for the Cupcakes
1 strawberry cake mix
1/2 cup oil
3 eggs
1 cup milk
For the Cheesecake Filling
1 3.4
1/2 cup milk
4 ounces cream cheese, at room temperature
1 1/4 cup Cool Whip, thawed
For the Strawberry Buttercream
1/2 cup butter flavored shortening
1/2 cup butter room temperature
1/4 teaspoon salt
1/2 teaspoon vanilla extract
1/2 teaspoon strawberry extract
1 Tablespoon water
3/4 cup diced strawberries
4 cups powdered sugar
Whole strawberries for garnish-optional
DIRECTIONS
Pre heat oven to 325 degrees. Line muffin tins with cupcake liners (18-20). Beat the cake mix, oil, milk
In a small bowl whisk the milk and pudding mix until creamy and thick. Beat the cream cheese until creamy, add the pudding mix to the cream cheese mixture until well combined. Fold in the whipped topping. Place this mixture into a large ziploc bag and
When the cupcakes have cooled you can use a cupcake corer or in my
For the frosting beat the shortening and butter until creamy. Add the salt, vanilla and strawberry extracts and beat again. Slowly add in the powdered sugar until it is combined.
Place the water and strawberries in a food processor or blender and purée. Pour the purée into the frosting and beat again until light and fluffy. To frost you can simply use a knife and frost the top of the cupcakes or you can use a piping bag and frosting tip to swirl the frosting on each of the cakes. Garnish each cupcake with a strawberry. You are ready to enjoy and share! It is best to store in the fridge.
Now that you have seen my creation I want to share with you some of Miss. B’s beautiful creations, take a look at these cupcakes! I should also mention Miss B also helps with the grocery shopping for all of the ingredients. This is where Elizabeth and Miss. B find much of their flavor inspiration. They think a lot about what is fresh and in season or maybe just something that interests Miss B at that moment! What a great way for them to spend the day. I’m looking forward to those days with my grandkids!


Aren’t these amazing? I should also mention that sweet Miss. B is only 6 years old! Yes, 6! I hope Miss B’s creations inspire you the way they did for me! A huge thank you to Miss. B, her grandmother Elizabeth, and Miss. B’s family for letting me share her amazing creations. I have no doubt Miss. B has an incredible cupcake recipe box! Keep cooking and baking Miss B, I’ll be watching for your creations!
Enjoy!
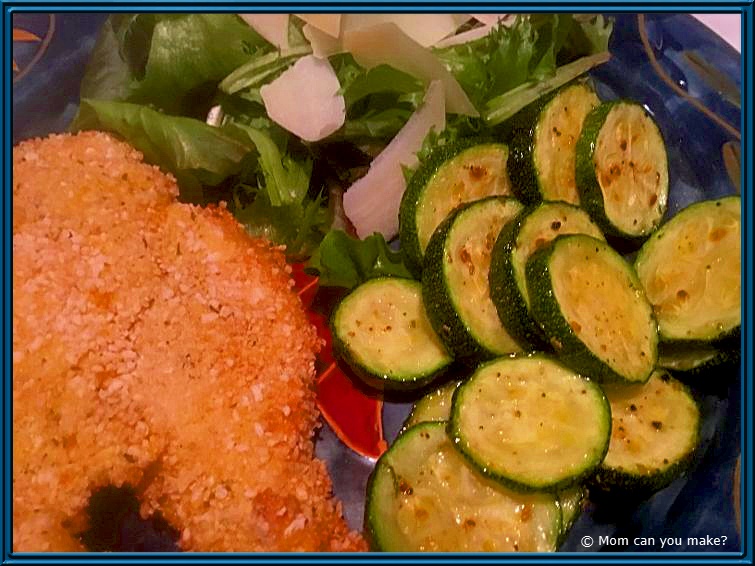
I have really been enjoying making fresh vegetables in the air fryer. It’s such a simple and delicious side dish to your dinner and done faster than my oven preheats! You can add any seasoning you like but I used an Italian seasoning blend giving it that pop of flavor I think zucchini needs. This dinner was just for Jim and so I only used 2 small zucchini.
INGREDIENTS
2 small zucchini sliced into 1/2 inch rounds
Drizzle of olive oil
1 teaspoon Italian seasoning
DIRECTIONS
Place your zucchini rounds in a medium bowl, drizzle with olive oil, enough to coat each of the rounds. Add the seasoning and mix to combine.
Air fry at 400 degrees for 7-8 minutes. Remove from fryer and serve warm.
Enjoy!
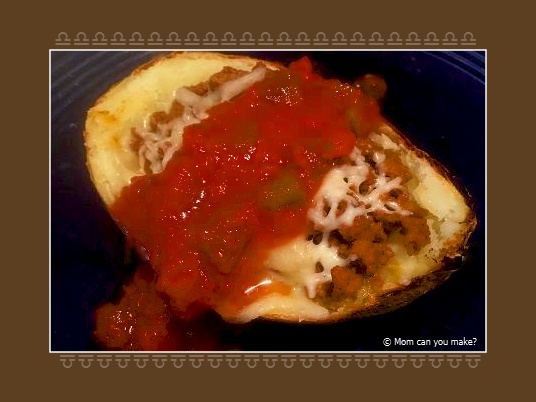
I could not decide what to make for dinner one night and also had some russet potatoes that needed to be cooked. I decided on taco stuffed potatoes. This is not a quick dish as it does take some time to bake the potatoes but the end result was really good and hearty on a cold winter night. I topped this with cheese and salsa and would have also added sour cream but I was out of it!
This would be a great option if you are having a few people over on game day!
INGREDIENTS
1 lb. ground beef
1 package taco seasoning, I used low sodium
4 russet potatoes
Olive oil
Pinch of salt
Pinch of pepper
1 cup shredded cheddar cheese
Your favorite salsa
Sour cream
DIRECTIONS
Pre-heat oven to 425 degrees.
Start with the potatoes, scrub them and dry them then rub each of the with olive oil, salt
During the last 20 minutes of cook time cook your ground beef in a medium sauce pan over medium heat. Crumble as it cooks. Add the package of taco seasoning following the instructions on the package.
When the potatoes are done remove them from the oven and slice them each in half lengthwise, remove some of the insides of the potato without breaking through the skin. ( I used the removed portion of the potatoes to make a small portion of mashed potatoes for another time). Fill the inside of the potato with your taco meat, top with cheese, salsa and sour cream.
Enjoy!
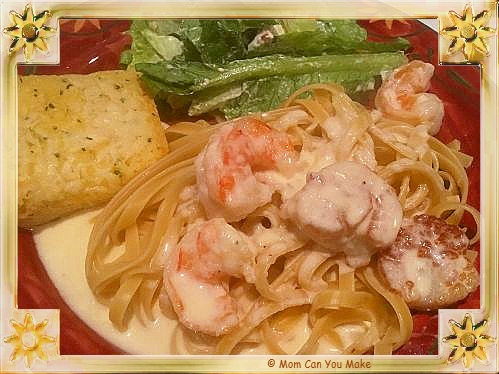
This year we celebrated Christmas early so I was trying to decide what to make on Christmas Day. This is what I decided on but our plans changed again. We decided on very short notice to take a road trip to see our daughter and her family in NY and spend Christmas with them and the grandkids. I ended up making this when we got home a few days later. Although I did plan on this for a special occasion, it is delicious for any night. I served this with a salad and garlic bread. This makes a lot of sauce so you can reserve some or use it for dipping breadsticks or the garlic bread like we do!
INGREDIENTS
16 ounces fettuccine
12 large scallops
12 large shrimp peeled, deveined and tails off
1 stick of butter
4 Tablespoons olive oil
5 garlic cloves, minced
4 cups heavy cream
pinch of black pepper
pinch of nutmeg
1 1/2 cups shredded Parmesan cheese
1 1/2 cups shredded Gruyere cheese
DIRECTIONS
Preheat skillet on medium high heat. Add 2 Tablespoons of the olive oil and sear the scallops on the first side until golden brown, flip and do the same for the second side, this does take a little bit of time, so don’t rush. While the scallops are
When the scallops and shrimp are both done, remove them from the skillet and pan (turn heat to medium) and set aside. In the same skillet you used for the scallops, melt the butter. Add the garlic, cream, nutmeg and pepper. Cook for about five minutes whisking often. Add both of the cheeses and continue to whisk as the cheese melts into the sauce. Continue to cook for 10-15 minutes, the sauce should be thickened and smooth. Continue to stir often. Boil the fettuccine noodles according to package directions. I usually take my pasta off one minute before the directions state. When the pasta is almost cooked through add the seafood into the sauce to warm through. Drain the pasta and add the sauce with the seafood over the top, serve warm.
Enjoy!
Stay In Touch


Follow me!
Recent Pins


