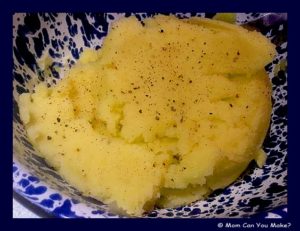
As you know having a family member that has to be gluten free and dairy free can be difficult. This is more difficult during the holidays when the food is a little more extravagant. More filled with heavy cream, cheese and so much more. The usual potatoes I make are filled with butter, heavy cream and cream cheese! Robby cannot have any of that so I wanted to find a mashed potato recipe that not only he could eat but also taste really good. I found a couple of recipes on Pinterest and combined both things I liked with the two recipes and the outcome was delicious. Not just for Robby, but for us too and not filled with all the fat my usual holiday potatoes have! I use a potato ricer to get the potatoes super creamy, no lumps in my potatoes!
INGREDIENTS
3 pounds of yellow flesh potatoes, peeled and cut into two-inch pieces
1 cup of potato cooking water- don’t forget to save it before you drain potatoes.
2 teaspoon salt
Fresh ground pepper to taste
A drizzle of garlic infused olive oil
DIRECTIONS
Place peeled and cut potatoes in a large pot and cover with cold water by a couple inches. Add two teaspoons of salt to the water. Bring to a boil and cook for 12-15 minutes or until potatoes are tender enough for a knife to easily slide in and out.
Save a cup of the cooking water before draining. Drain potatoes and return them to the cooking pot over medium heat tossing them for a minute or so until they are dry. Mash the potatoes or remove them from the heat and use a potato ricer. Add 6 tablespoons of good olive oil and stir through. Thin potatoes with water a little bit at a time until you are happy with the consistency. Season to taste with salt and pepper and lightly drizzle with garlic infused olive oil. Use this sparingly as it packs a lot of flavors. Serve warm.
Enjoy!

 Are you looking for a new dessert for your holiday table? I have mentioned in the past baking is not really my thing. Well, it’s not our daughter Amanda’s either, but she was looking for a cherry pie recipe that was delicious and easy. Needless to say, I turned to the tried and true recipes from Taste of Home magazine. You can find them online through Facebook and Pinterest as well. I am a volunteer Field Editor for them. I sent Amanda this recipe knowing that it would be easy for her to make and still have great flavor. Amanda, her husband Steve, the twins and extended family enjoyed the pie after their Thanksgiving dinner. I heard not a crumb could be found!

INGREDIENTS
1 1/2 cups flour
1/2 teaspoon salt
1/2 cup shortening
1/4 cup ice water
2 cans (16 ounces each) tart cherries
1 cup of sugar
3 Tablespoons quick cooking tapioca
1/4 teaspoon almond extract
1/4 teaspoon salt
Red food coloring-optional
1 Tablespoon butter
DIRECTIONS
In a large bowl combine flour and salt. Cut in the shortening until crumbly. Gradually add water tossing with a fork until dough forms a ball. Divide dough in half. Roll out one portion. Line a 9-inch pie plate with bottom crust and trim pastry even with the top edge of pie plate.
Drain cherries, reserving 1/4 cup of the juice. In a large bowl combine the sugar, tapioca, extract, salt, food coloring if desired and reserved juice. Gently stir in the cherries. Let stand for 15 minutes.
Pour into crust. Dot with butter. Roll out the remaining pastry. Make a lattice crust, seal and flute edges. Bake at 375 degrees for 55-60 minutes. Cool on a wire rack.
Enjoy!

 A few weeks ago we attended a friend’s retirement celebration on his last day working for his local fire department. After the celebration, we decided to try a new restaurant that just opened in Stratham NH, that was in the same area. I read about Sue’s Korean Kitchen in our local paper and knew it would be a great place to check out. We don’t have many Korean restaurants in our area, not to mention one that is truly authentic.

Sue’s Korean Kitchen is quite small but does have a little seating area to wait for a table or for takeout orders. The seating area is very simply decorated with canvas pictures of many of the dishes they serve. All of your senses go into overload just walking in. The smells you get walking through the door then the beautiful pictures of the food on the walls, I was hungry before I even had the menu!

We were seated at one of the small tables in the middle of the dining room with chopsticks waiting for us along with their menu. The menu, although small, has flavors for anyone with various spice levels from mild to hot. And, don’t worry if you don’t use chopsticks they have regular utensils as well!

A quick glance at the appetizers was all it took to know that we would be ordering the beef Mandoo. This is a Korean
pan-fried dumpling. You get six for $7.95. You can also get an all-vegetable version as well. These were very good, crispy on the outside, soft and full of Asian flavors on the inside. The beef is very tender and goes beautifully with the vegetables in the dumpling. What a great start!
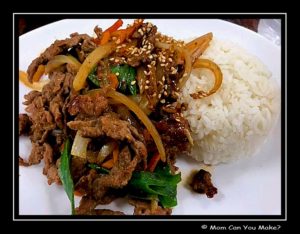
For my main course, I ordered the Beef Bulgogi ($14.95). Beef Bulgogi is Korean marinated beef with carrots, onions and scallions served with a side of white rice. I really enjoyed my dish. The beef was tender and flavorful with the sautéed vegetables still having a crisp bite to them and served with white rice as the perfect compliment to the dish.
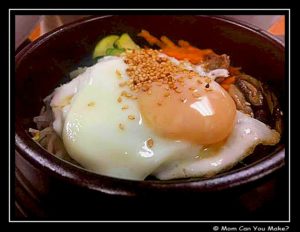
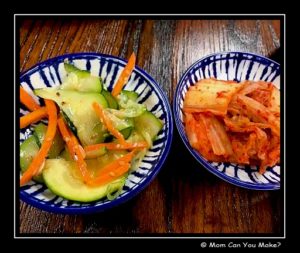
Jim had the Dolsat Bimimbap. This is a Korean rice bowl mixed with spinach, carrots, bean sprouts, mushrooms, and cucumber. You can also add an egg and the Korean beef, and Jim did. ($16.95). This dish comes in a hot stone bowl and, let me tell you, it kept the dish piping hot through our entire lunch! No joke, it was just as hot when it was served until the time we left. This is an amazing dish with tons of flavor not to mention the perfectly steamed egg. When you cut it open all of that yolk goodness goes all through the dish making it just a little more decadent than it already is. Both dishes came with a side of a cucumber and carrot salad dressed in a very light dressing. Very good and so fresh, as well as
house-made kimchi. I’m not a big kimchi fan, but Jim enjoyed it!
Check them out of Facebook and online. If you are in the area of
74 Portsmouth Ave. in Stratham NH, stop in at Sue’s Korean Kitchen for a dine-in or take out!
https://www.sueskoreankitchen.com/
Enjoy!


We all love Asian flavors in our house, but don’t always want to go out to get it especially this time of year when I just don’t feel like I have much time. This dish was simple to make and had much of the flavors of the Kung Pow Chicken you would get going out to eat. I did not add the zucchini as that ingredient somehow did not make it on my shopping list…I did mention it’s a little crazy this time of year right? But in all honesty, there are very few recipes that I make that don’t get changed in one way or another, if not by accident, but by my families taste. So if you forget something or your family prefers a different vegetable, give it a try!
INGREDIENTS
1 pound ground chicken
2 Tablespoons vegetable oil, divided
1 red bell pepper, minced
1 large zucchini, minced
1/4 cup diced scallion, 1/2 inch pieces
1 teaspoon ground ginger
1 teaspoon ground garlic
1 teaspoon crushed red pepper
1 teaspoon sesame oil
1 teaspoon white wine
2 1/2 Tablespoons soy sauce
1 Tablespoon cornstarch, mixed with 4 Tablespoons water
2 ounces dry roasted peanuts, crushed
Cooked white rice for serving
DIRECTIONS
Heat wok or skillet on high heat for just a minute or so, just enough to heat the skillet or wok.
To the wok or skillet, add 1 tablespoon Of canola oil and add the ground chicken. Cook the chicken until nice crust forms before breaking apart. Then finish cooking and breaking it apart while it finishes cooking through. Once the chicken is cooked through, remove the chicken from the pan and add the other tablespoon of oil. Add the red bell pepper and the zucchini to the pan, cook on high for 1-2 minutes until just caramelized and just slightly cooked.
Add the red pepper, scallion, ginger, garlic, crushed red pepper, and sesame oil. Add the cooked ground chicken back into the pan, stir and combine all of the ingredients. Add the wine, soy sauce and water mixed with cornstarch. Bring to a boil for a minute or so or until the sauce has thickened.
Garnish with the peanuts. Serve warm over rice.
Enjoy!

 I hope everyone had a wonderful Thanksgiving! Time seems to be going much too fast these days. We had a really nice Thanksgiving at our house with family, friends and some delicious food from start to finish. Needless to say, I went to bed tired and stuffed from the day but that was okay with me as I could take the next couple days off! No Black Friday shopping for me but watch out cyber Monday!
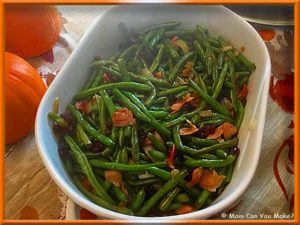
So this is another Taste of Home recipe that has been gaining a lot of attention and I can see why! Although this recipe calls for steaming the fresh green beans I turned it into a one-pot dish by using the frozen green beans in the steam bags and putting my microwave into action. I did not put the bourbon in just because I did not have any. This is a simple tasty dish, great for any holiday side dish. It will be making a second presence on my table at Christmas. This dish is perfect to make while the turkey rests!
INGREDIENTS
3 cups fresh green beans or 2 bags of frozen green beans in the steamable bags
1 large onion chopped
4 bacon strips cut into 1-inch strips
1/2 cup dried cranberries
1/4 cup maple syrup
1/4 teaspoon salt
1/4 teaspoon pepper
1 Tablespoon bourbon-optional
DIRECTIONS
In a large saucepan, place steamer basket over 1 inch of water. Place beans in the basket. Bring water to a boil. Reduce heat to maintain a low boil, steam, covered until crisp-tender. 4-5 minutes. Or do what I did and buy the frozen bags, steam according to the package.
Meanwhile, in a large skillet, cook onion and bacon over medium heat until the bacon has crisped through. Drain bacon fat if necessary. Add the cranberries, syrup, salt, pepper, and bourbon, if desired. Add beans to the bacon-onion mixture heating through and tossing to combine. Remove from heat and serve warm.
Enjoy!


