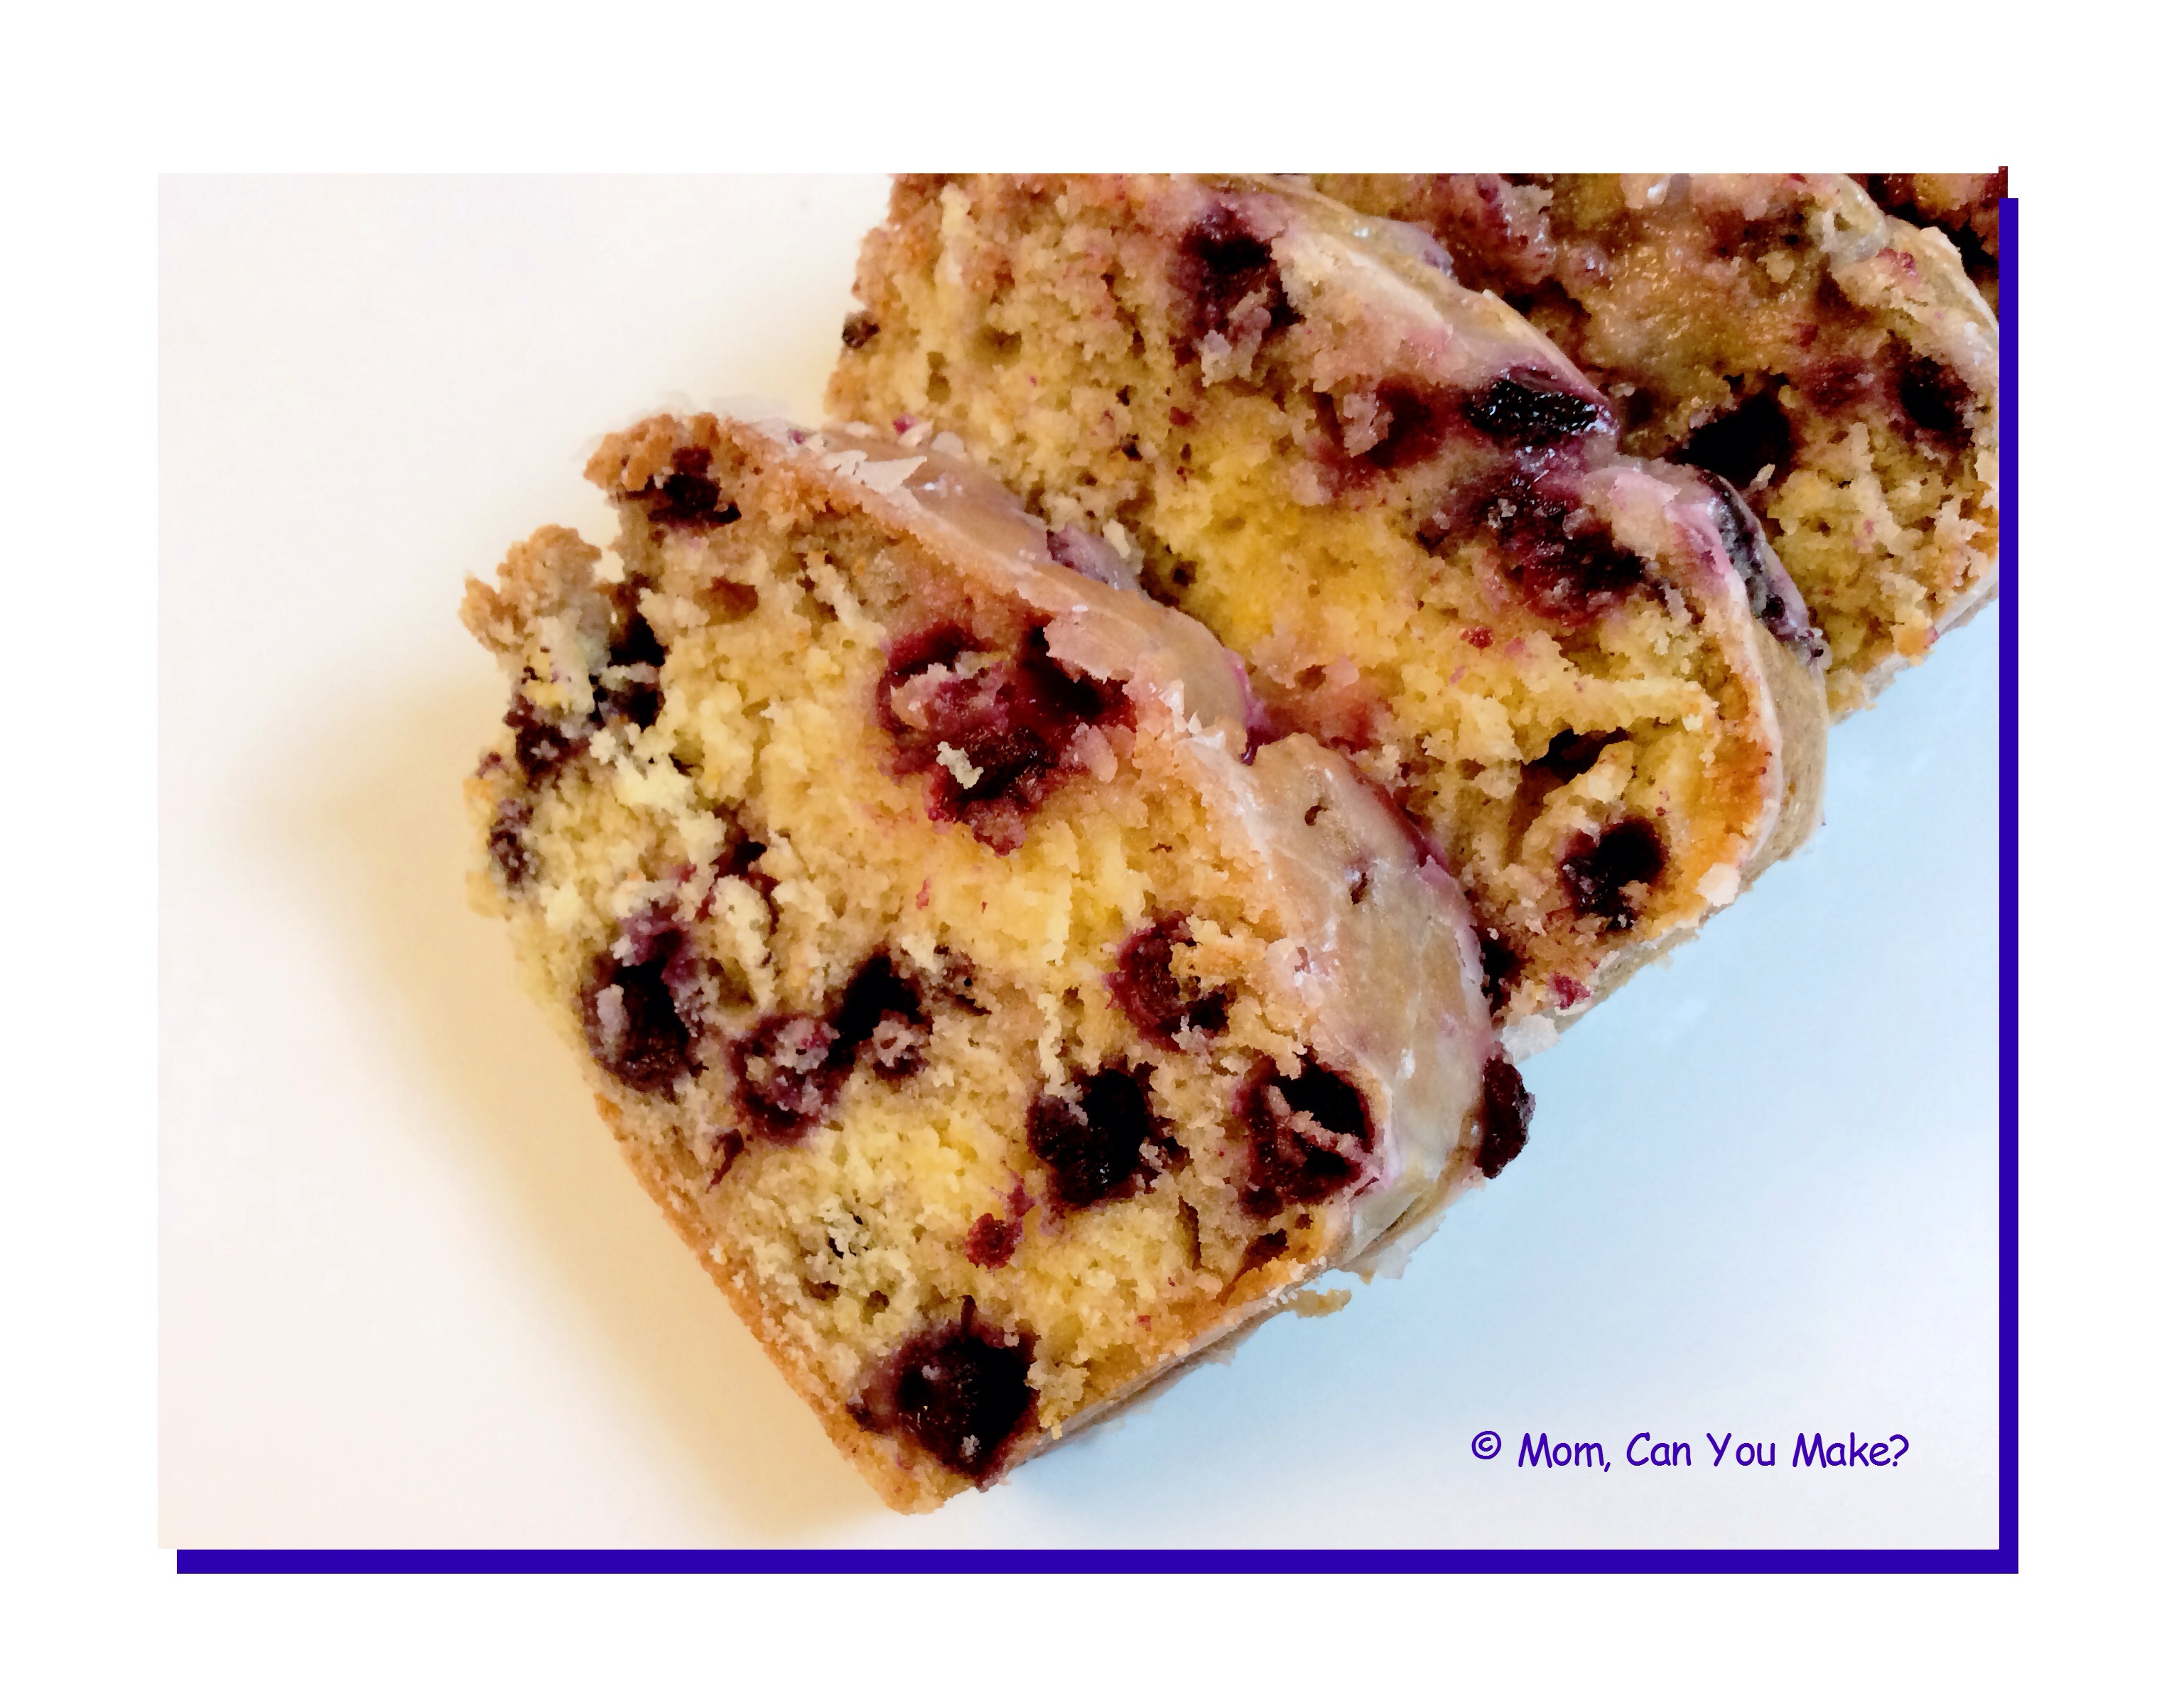
This blueberry loaf is fantastic! Juicy blueberries with a burst of lemon…and oh so good!
This IS Jim’s FAVORITE blueberry bread, or really just his favorite bread. He could eat the entire loaf himself and if he had it his way… he would! It really is delicious.
This loaf has a few steps but it is all worth it. It has a lemon syrup ANNNNNDDDD….a lemon glaze!!!! Sweet and tart!
INGREDIENTS
1 1/2 cups flour plus 1 Tablespoon
2 teaspoons baking powder
1/2 teaspoon of salt
1 container of yogurt (I used Greek lemon yogurt-Stonyfield 5.3 ounces)
1 cup sugar
3 large eggs
2 teaspoons grated lemon zest (about 2 lemons)
1/2 teaspoon vanilla extract
1/2 cup vegetable oil
1 1/2 cups blueberries (fresh or frozen)
LEMON SYRUP
1/3 cup fresh squeezed lemon juice
1/3 cup sugar
LEMON GLAZE
1 cup confectioners sugar
3 Tablespoons of fresh squeezed lemon juice
DIRECTIONS
Preheat oven to 350 degrees, Spray three 3×5 mini tin pans with baking spray. In a medium bowl whisk together flour, baking powder and salt. Set aside.
In a large bowl, whisk together the yogurt, sugar, lemon zest, eggs, vanilla and oil. Slowly whisk the dry ingredients into the wet ingredients. In a separate bowl mix the blueberries with the remaining tablespoon of flour and fold them into the batter. Pour the batter into the prepared pan and bake 45-50 minutes or until a toothpick inserted comes out clean. Let cool in pan for ten minutes before removing to a wire rack that is placed on top of a baking sheet.
While the loaf is cooling make the lemon syrup. In a small sauce pan over medium heat, stir together lemon juice and sugar until the sugar is dissolved, then cook for 3-4 minutes and remove from heat. Set aside.
Use a toothpick to poke holes in loaf top and sides (while the loaf is warm) brush the top and sides with the syrup and let soak in, then brush again. Let the cake cool completely.
To make the lemon glaze mix the confectioners sugar and lemon juice , this should not be too thick as you want to drizzle it over the loaf.
If it is thick add more lemon juice. Pour lemon glaze over loaf and let dry for about 15 minutes before slicing.
Enjoy!

Notes: This recipe was adapted from Sweet Peas Kitchen.

The title says it all! This is hands down our favorite salad! BIG FLAVOR!
This salad does take some time for the chicken marinade, chopping, dressing AND a peanut sauce! All of that for just one salad! It is well worth the effort!
CHICKEN MARINADE
1/2 cup vegetable oil
2 Tablespoons of rice vinegar
1/4 cup sugar
1 clove of garlic
1/2 bunch of cilantro
1 lime, juiced
salt
pepper
4 boneless skinless chicken breasts
SALAD
2 Hearts of romaine, chopped
2 or 3 handfuls of already made coleslaw mix
1 cucumber (peeled and chopped)
1 red bell pepper
5 scallions
1/2 bunch of cilantro
1 cup salted peanuts
DRESSING
1/2 cup rice vinegar
1/2 cup Thai sweet chili sauce
2 teaspoons sesame oil
1 teaspoon sugar
salt
pepper
PEANUT SAUCE
1/2 cup natural peanut butter
4 Table spoons reduced sodium soy sauce
2 Tablespoons rice vinegar
1/4 cup to 1/2 cup water
DIRECTIONS
In a ziploc bag , combine all the ingredients for the chicken marinade. Mush it around, then let marinate in the fridge for at least 4 hours. Cook chicken on the grill until done or bake at 350 degrees for 40 minutes. Allow the chicken to cool slightly and cut into bite size pieces.
Combine the salad ingredients in a large bowl.
Mix dressing ingredients together .
Mix peanut sauce ingredients together
To build salad individually, place salad ingredients in a bowl , add some of the dressing and mix. Add chicken and drizzle with peanut sauce.
Notes: I like to make the dressing and peanut sauce in medium size mason jars mixing well.
Add water to the peanut sauce cautiously , you want to be able to drizzle it over the chicken. If you make this after the peanut sauce has been in the refrigerator warm in the microwave slightly to drizzle easier.
Recipe adapted from wwwtasteandtell.com
Hello to my slow cooker! There is nothing better than a dinner cooking all afternoon while I get laundry, dishes and cleaning done or …maybe put my feet up , eat some bon bons and pretend I am working hard on a delicious dinner . I will never tell what I am doing and will never tell what you do in your home!
This post came about a while back while my brother-in-law Bobby and I were having a conversation about his dislike for any food coming out of the slow cooker. He made it clear it was not his favorite. I wanted to change his mind, as I know there are several great slow cooker recipes out there. So here ya go Bobby! My first slow cooker recipe to you…with more to come! Check out the serving suggestions below!
INGREDIENTS
1/2 cup honey
1/2 cup brown sugar (light)
1/3 cup balsamic vinegar
1/3 cup low sodium soy sauce
5 cloves fresh garlic minced
2 teaspoons Siracha (or more , depending on your taste)
pepper
4 boneless, skinless chicken breast
2 tablespoons cornstarch
2 tablespoons water
DIRECTIONS
In a sauce pan add the honey, brown sugar, balsamic vinegar, soy sauce , siracha and season with black pepper. Bring to a boil , then lower the temperature and simmer. I simmered this for almost a half hour on low heat stirring often. It became pretty thick. (I almost thought I brought it too far) so be careful not to burn it! Let cool……
In the slow cooker add the chicken, pour in the cooled sauce, add the garlic and stir until coated. Put the lid on and cook on high for 4 hours flipping chicken a few times.
At the four hour mark take the chicken out and shred using two forks. While the chicken is out of the pot mix the cornstarch and water in a small bowl then add to the crockpot. Turn the slow cooker on high, add the shredded chicken back into the slow cooker and continue cooking on high for one hour.
Notes and serving suggestions:
If you want to make the sauce the night before that would be fine , store sauce in fridge and add everything into the crockpot in the morning I think that would work well.
When I made this recipe I had hoped to have a second recipe for a slow cooker rice, I came upon a rice recipe and thought that would be great to have a slow cooker rice and would be able to cook both recipes at the same time and could continue sitting back with those bon bons, oops, I mean chores and hard work..cough, cough …well…this did not happen, the rice recipe SUCKED! Do not cook rice in your slow cooker! you heard it here first ! DONT DO IT! ugh…HORRIBLE!
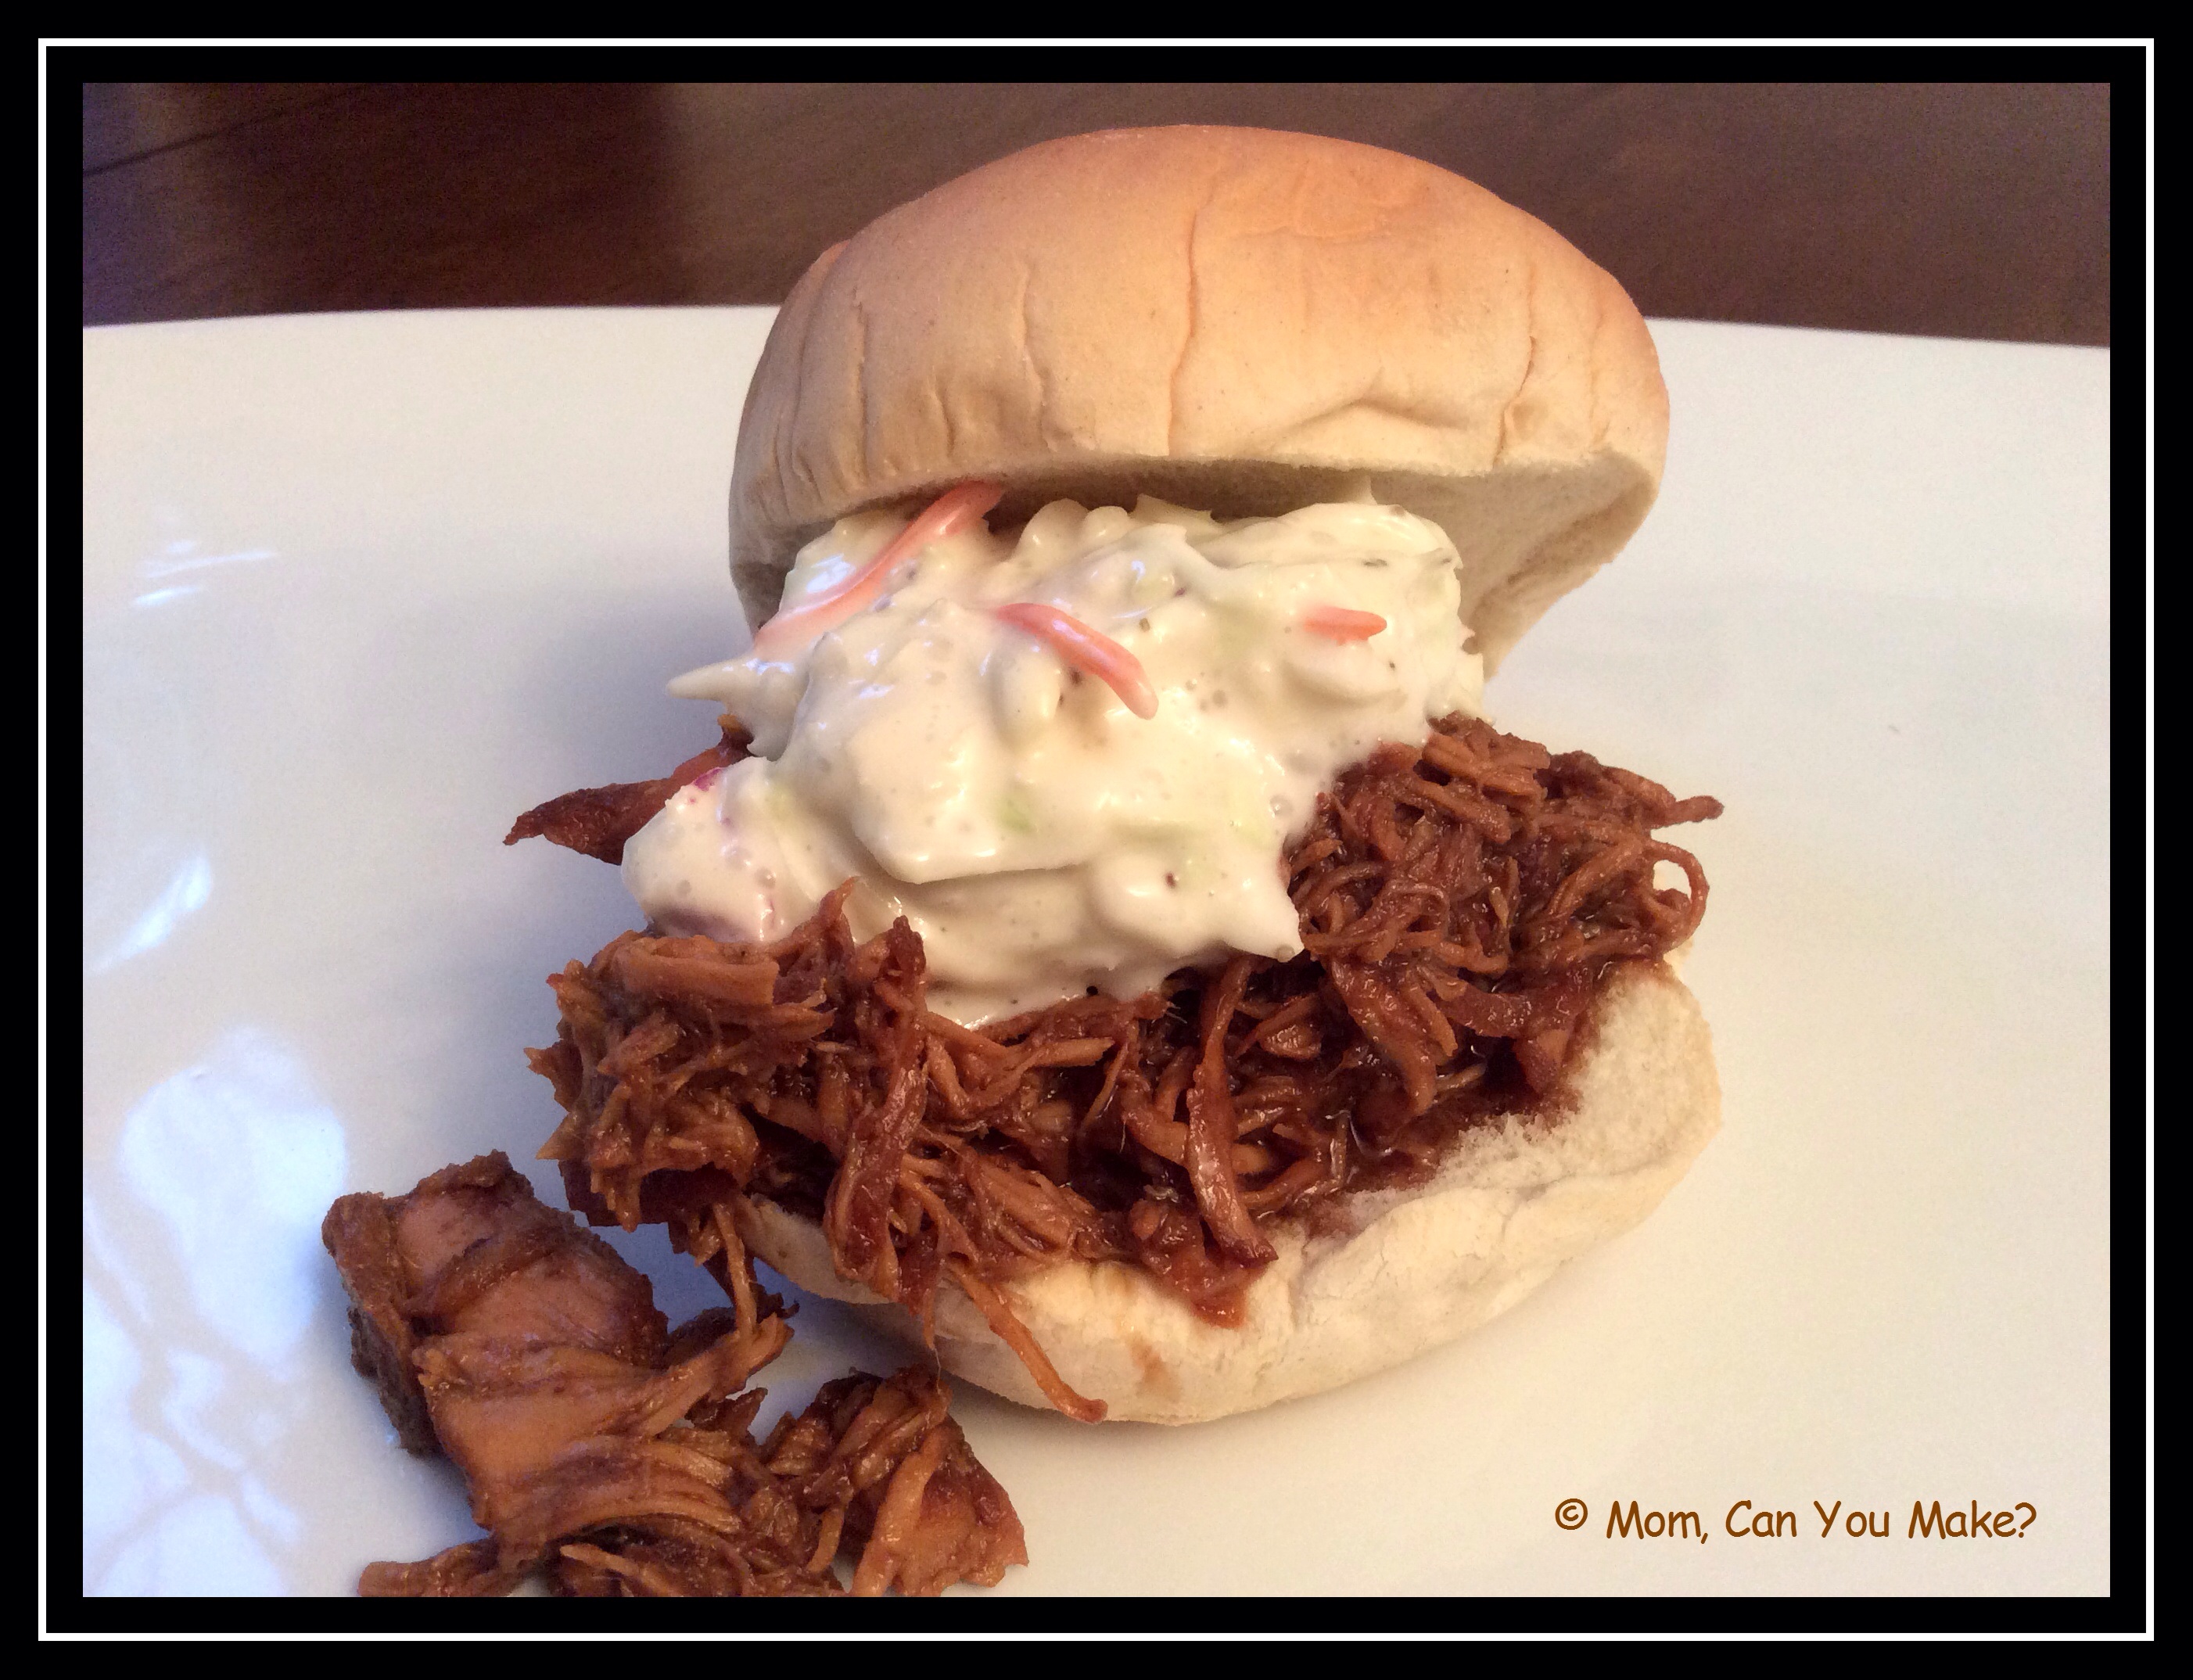
SO …serve over your favorite white rice, NOT cooked in your slow cooker OR serve as a sandwich or slider with your favorite coleslaw! That is what I did and it was fantastic!
We had some left over the next day so I made some pasta with Alfredo sauce and added the shredded chicken to it and that too was very good!
Cheers Bob!
Enjoy,

I have been making this recipe for years . It is a favorite of our niece, Becky. This recipe is not only easy, but very easy to change to your families tastes. You can change the ground beef to ground chicken or turkey, change the cheese to any blend you like and change the heat level from mild to as hot as you want! The recipe below is a family favorite!
INGREDIENTS
1 lb. ground beef
1 envelope taco seasoning medium spice and low sodium
4 ounces of cream cheese
Jumbo pasta shells
1 tablespoon butter
1/2 cup (give or take ) your favorite salsa with any heat level YOU like , we use medium heat
1 cup taco sauce, medium heat
1 cup sharp cheddar cheese
1 cup Monterey Jack cheese
1 cup crushed tortilla chips
Sour cream
DIRECTIONS
Preheat oven to 350 degrees.
In a skillet, cook beef until no longer pink. Add taco seasoning, add cream cheese. simmer until cheese is melted. Transfer to a bowl and set aside. Cook pasta shells according to package. Drain and toss lightly with butter.
Spread the salsa over a 9 x 13 pan. Fill each shell with the meat mixture and place on top of salsa, continue until meat mixture is gone. Cover shells with taco sauce.
Cover and bake for 30 minutes. Uncover sprinkle with cheese and crushed chips. Bake 15 minutes uncovered.
Serve with sour cream.
Add a salad and garlic bread and dinner is complete!
NOTES:
If you have left over meat mixture you can use this to top nacho chips.
This can be frozen, follow directions up until you put it in the oven. Prior to freezing add the cheese. Cover with plastic wrap then a layer of tin foil. I always label the tin foil with what the dish is and the heating directions from frozen. To re-heat from frozen, I take the dish out the day before I want to make it, pre heat oven to 350 degrees, bake COVERED for 40 minutes, uncover adding the crushed chips and bake 15-20 minutes until heated through.
ENJOY!
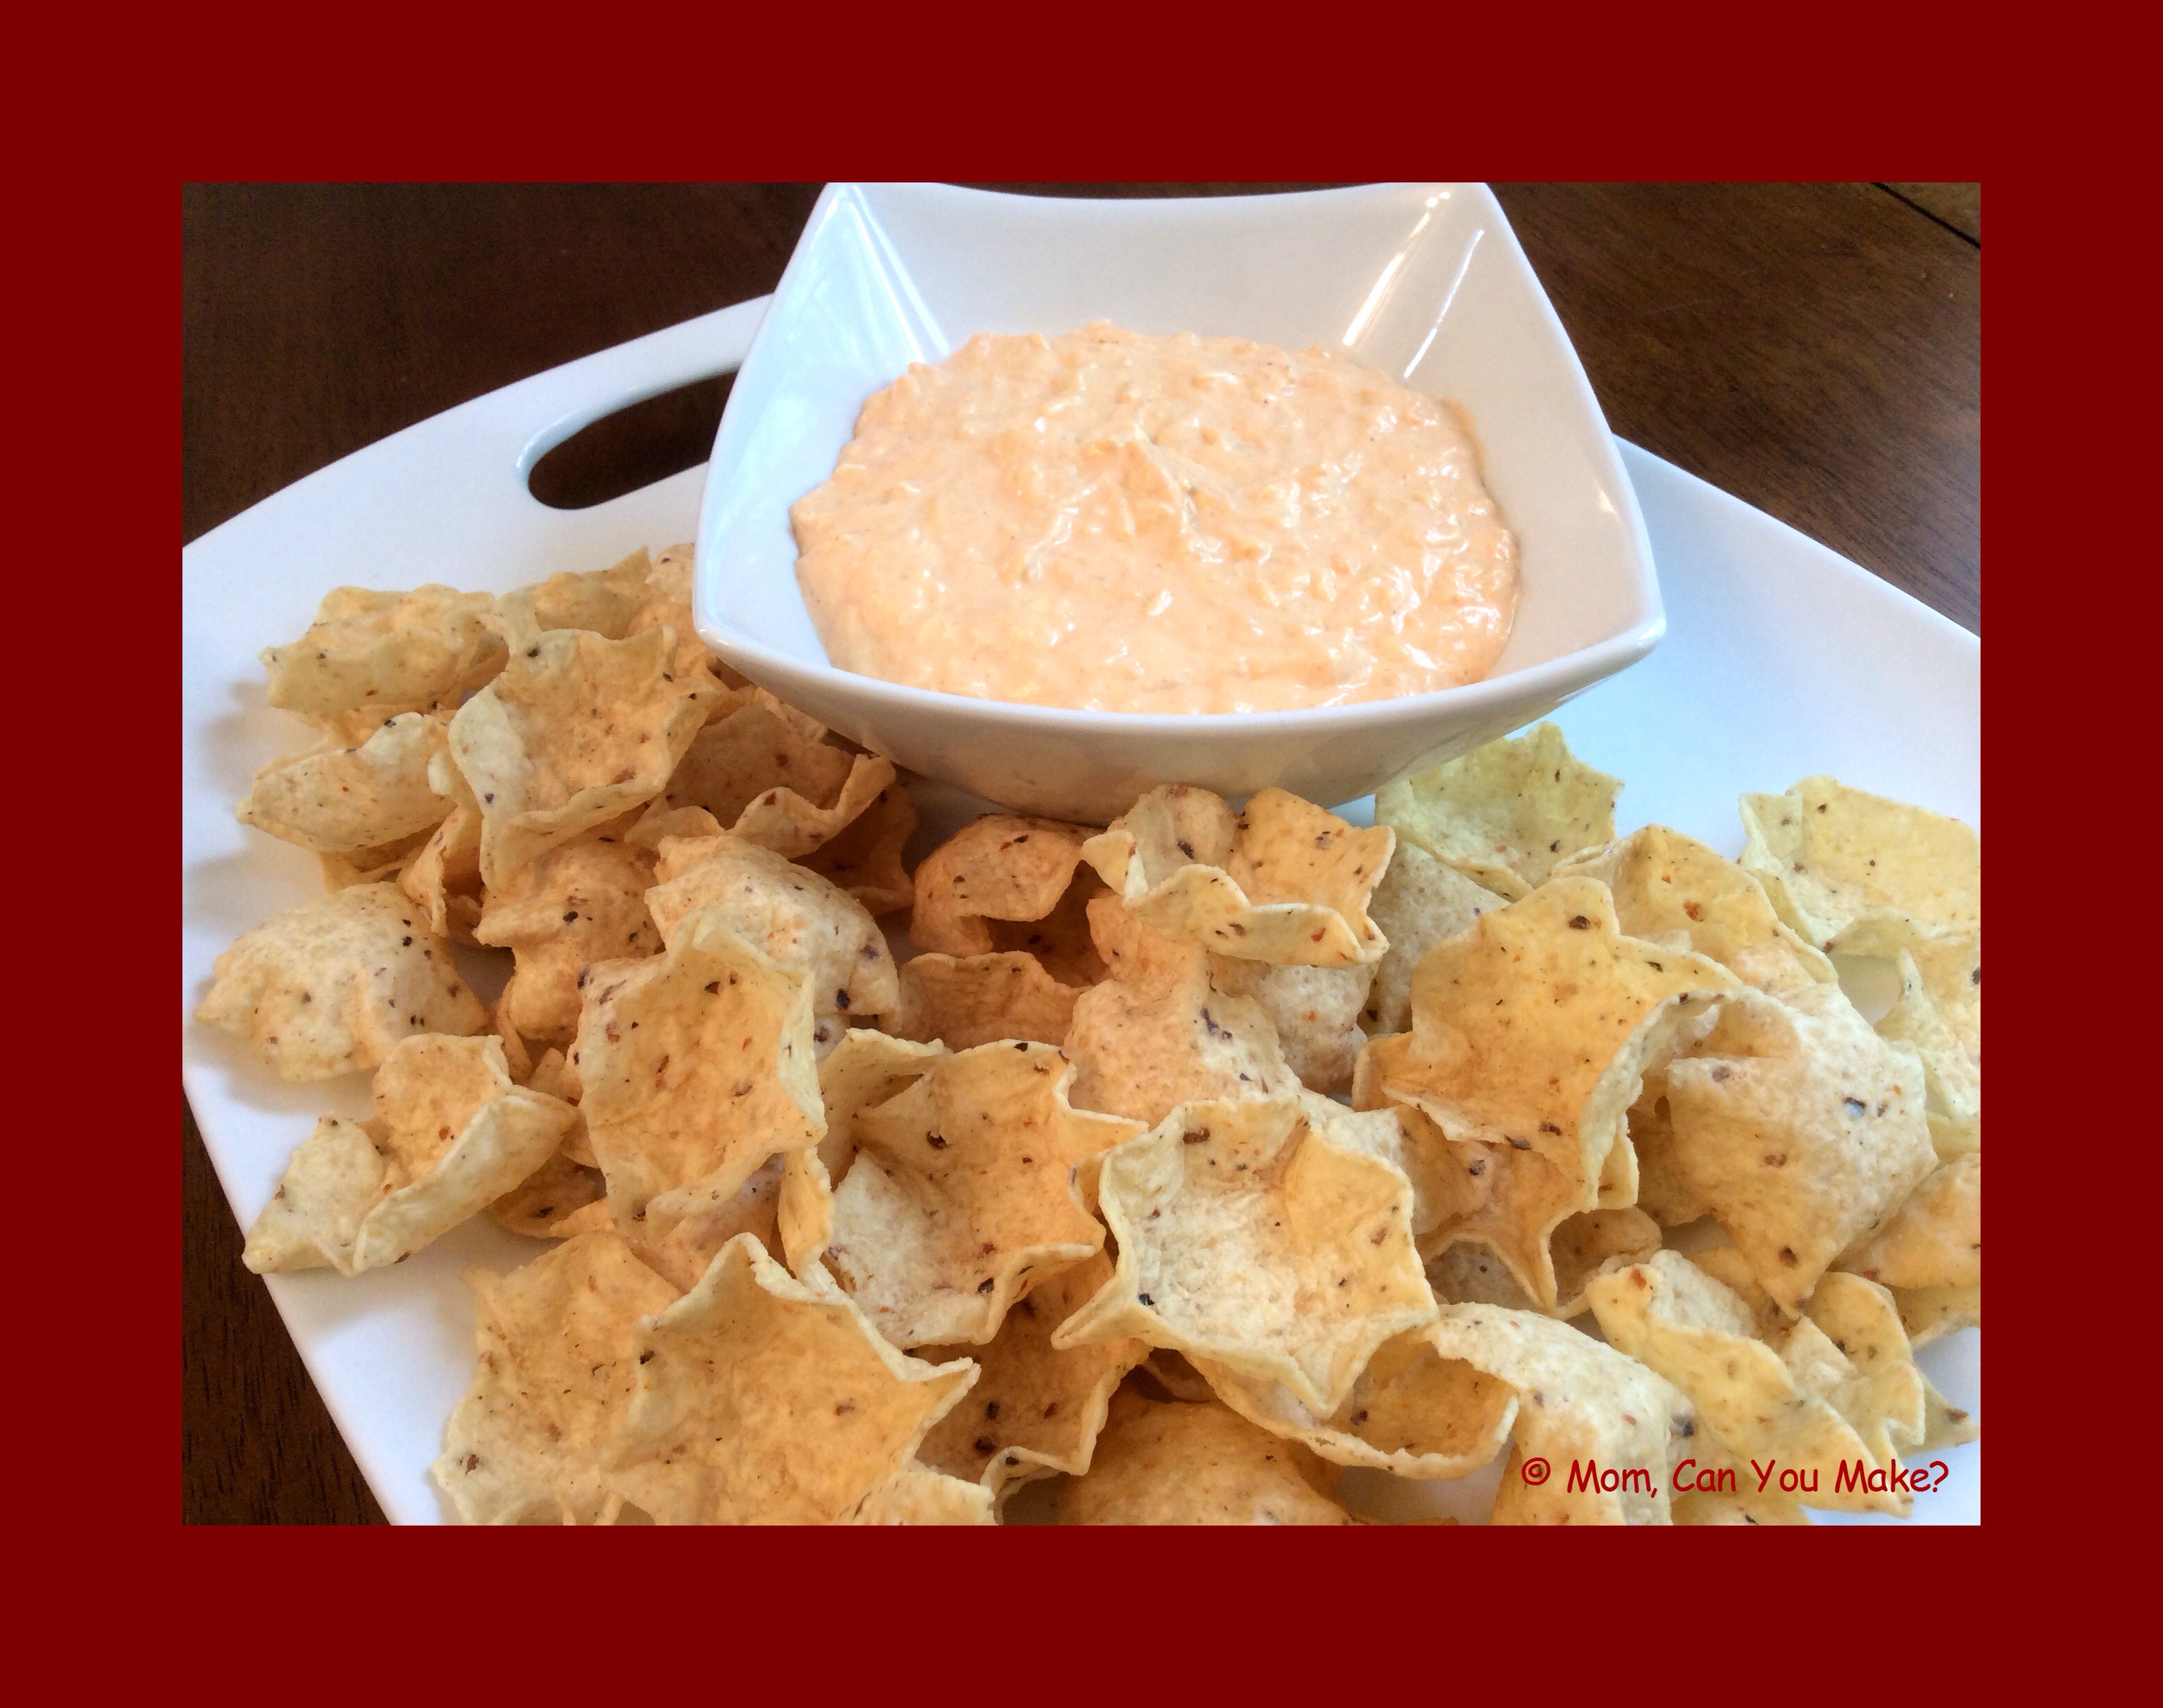

Ok, so we have all seen the buffalo chicken dip and have utterly, completely loved it! Lick the spoon clean delicious! I have the basic buffalo chicken dip recipe crockpot style and I am including buffalo chicken won tons, yup , you heard it …that dip put in won ton wrappers and fried! YES PLEASE! My sister- in- law Mary Ellen loves the dip. I know she is gonna just love the won tons!!!
When I was thinking about various ways to use the buffalo dip, I had several things come to mind. The fried won tons were my first thought, or how about the dip put in the those little fillo shells and top with blue cheese or ranch dressing. Maybe slathered on top of a grilled burger with a blue cheese sauce. The possibilities are just endless! If you have any ideas I would love to hear them!
INGREDIENTS
10 ounces of chicken (I like to use rotisserie chicken but you can use left over chicken or, yes, even canned chicken)
2 8-ounce packages of cream cheese
1 cup ranch dressing
3/4 cup hot pepper sauce (I use franks)
1 1/2 cup shredded cheddar cheese
Serve with
Celery, crackers or our favorite way tortilla scoops!
DIRECTIONS
Put cream cheese, ranch dressing and shredded cheese into the crockpot. mix chicken and hot sauce together in a bowl, mixing well then add to the crock pot.
I start the crock pot on high for a half hour, then turn it to low or to the warm setting. I mix it now and again until all the cheese in incorporated.
Serve with celery, cracker or tortilla chips
Enjoy!
~ A
BUFFALO CHICKEN WONTONS
Buffalo dip, above
wonton wrapper
Vegetable or peanut oil for frying
water
OPTIONAL
Blue cheese dip for serving
8 ounces of sour cream
1/2 cup crumbles blue cheese
2 teaspoons of franks hot sauce
scallions for garnish
DIRECTIONS
Heat oil in a heavy bottom pan or use your deep fryer
Fill won tons with some of the dip (I did not measure but I think I used just over a teaspoon full). Rub a small amount of water over the edges of the won ton and seal won tons to make a triangle. Place won tons very carefully into heated oil, fry until lightly golden brown and remove onto a paper towel covered plate.
NOTES:
Be VERY careful with oil, never turn your back as these cook very quick!
If using a deep fryer, set the oil to 350 degrees. If using a heavy bottom pot to find out if the oil is hot enough use a thermometer OR take the bottom of your wooden spoon place in the oil and when you see little bubbles forming around the spoon then your oil is hot!
Do not over fill as you don’t want the filling to blow out as it fries.
If you are making a lot of these and want to keep them warm place them on an oven safe platter or dish and put them in warm oven (lowest setting).
ENJOY!


