Grilling
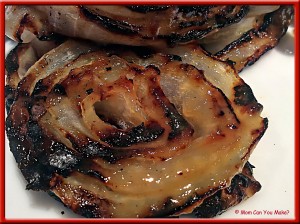
It has been a long cold winter in New Hampshire. I am happy to say my grill is going and I am loving it!! I made these onions the other night and if you like honey mustard you are going to love this side dish! These were very good and a change of pace as I have not made anything like this before!! The one thing I will say is to slice the onions at least 1/2 inch thick as they do soften and can fall apart a little bit during the grilling process.
INGREDIENTS
1/4 cup olive oil
2 Tablespoons butter, melted
1/4 cup Dijon mustard
1/4 cup honey
1 1/2 teaspoon Worcestershire sauce
2 large vidalia onions – peeled and sliced in 1/2 inch slices
DIRECTIONS
Heat the grill to medium high heat. Whisk oil and melted butter together in a small bowl and set aside. Whisk mustard honey, Worcestershire sauce in another small bowl and set aside.
Run two metal skewers or bamboo skewers that have been soaked in water through the sides of the onion, placing skewers about an inch or so apart. Brush both sides of the onion with the oil mixture and place on the heated grill . Cook onions for about 11 minutes turning and getting char marks on both sides. During the first 3-4 minutes baste with the honey mustard sauce on both sides. You can serve any extra sauce on the side or add a little more glaze when finished grilling. Serve warm.
Enjoy!

Found on Pinterest

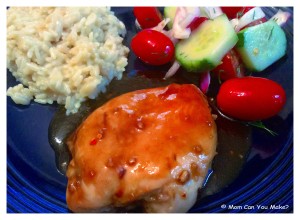
This recipe was so simple on a weeknight. I used chicken breasts, but you could easily use chicken thighs for more flavor. These would also be great cut up, skewered and grilled for an easy summertime dinner!
INGREDIENTS
1/2 cup of olive oil
2 Tablespoons of Maple Syrup (the real stuff)
2 Tablespoons Balsamic Vinegar
2 teaspoons dijon mustard
2 garlic cloves, minced
1/4 teaspoon crushed red pepper flakes
2 pounds chicken breasts or thighs, boneless, skinless
DIRECTIONS
Mix everything together except the chicken. Divide the sauce in half, place half of the sauce in a Ziploc bag and add the chicken. Let marinate for a couple of hours. Save second half of the sauce to use as a dipping sauce or glaze when the chicken is done cooking. When you are ready to bake, remove chicken from marinade and place in a baking dish. Discard the liquid that you used to marinade the chicken. I baked my chicken at 350 degrees for 35 minutes. Depending on the size of your chicken cooking times may vary, cook chicken all the way through with NO pink!
Glaze the chicken with the second portion of your reserved sauce.
Enjoy!
This recipe can be found at www.lovelylittlekitchen.com
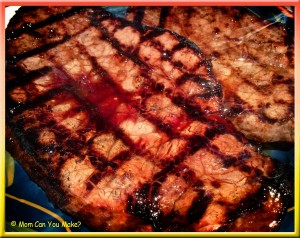
It has still been chilly here in the northeast, but I could not help but fire up the grill! Some of my favorite recipes come from the grill and this is no exception. The marinade on this steak is so good that Jim’s mouth was watering before it hit the plate! I don’t eat a lot of steak, but this was very tasty!!
INGREDIENTS
1/2 cup of low sodium soy sauce
1/2 cup cooking sherry
3 Tablespoons honey
2 Tablespoons sesame oil
2 Tablespoons minced ginger
3 cloves minced garlic
1/2 teaspoon crushed red pepper flakes
1 Top Round steak (any marinating type steak would work)
DIRECTIONS
Mix all of the ingredients together except the steak. Combine well. Add the mixture into a resealable bag in a glass dish. Add the steak and let marinade for 3-6 hours in the fridge. Remove steak from the bag/dish and when your grill is at a medium high heat go ahead and place the steak on the grill. Sear the first side of the steak, then turn to sear the second side. When both sides have nice grill marks turn your grill to medium heat and finish cooking to your desired liking. Remove from heat, let rest for ten minutes, slice and serve.
Enjoy!
This recipe comes from www.pioneerwoman.com
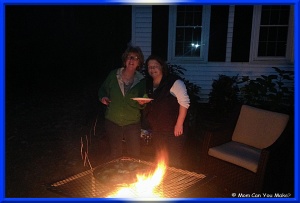
 There is nothing better than a last minute get together! I got a text from my foodie neighbor asking if we were free for Veteran’s Day as her husband Randy’s trip was cancelled due to the snow storm in Minnesota. I was thrilled and could not answer her text quick enough! We have been planning this get together for some time but with all of our schedules it was very difficult. Okay, if you follow my blog you might know that a friend of ours Craig (
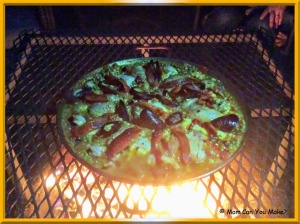 who works with Jim at the fire department) created something special for me…well this is the recipe and why I asked him to make it! Craig created a cooking surface for me to put on top of my fire pit. How awesome is that? I should probably explain a little more.
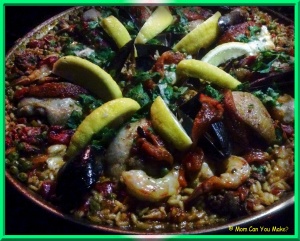
Our neighbors Rosalie and Randy, along with our family have taken a number of camping trips together and have cooked the most fabulous meals over an open fire… everything from pizza to cookies! You name it, we cooked it, and most times shared it with many campers next to us! Sadly we sold our camper a couple years ago as we had outgrown that camper and Jim was leaving for Afghanistan. We did not want the camper to just sit for a year, so not wanting to give up our great outside fire dinners this was the best solution! Thank you Craig! Rosalie is an amazing cook and every time I am in the kitchen with her I learn something new and love it! I have to say I think the boys love it just as much as they eat like kings! We had the most amazing day as the weather was perfect, we could not have picked a better day. Rosalie was wonderful and did all of the shopping and came over to start our day where Randy was the mixologist for the afternoon. Jim was in charge of the fire pit …I know, not much of a stretch there as he works for the fire department and Rosalie and I went to work with chopping , dicing and we both deboned chicken thighs for the first time! Kitchen shears are your friend for that task! I told you I learn something new every time. We even roasted our peppers! yup…two foodies in action! We divided and conquered all of the chores that making a Paella entails. If you are new to Paella, it is made up of three “pillows” the first being the sofrito, that is the colorful base, a combination of caramelized diced onions, garlic , tomato and parsley and in addition to flavor and color this helps thicken the sauce as the rice thickens. The second layer is the saffron, I had to laugh as when Rosalie was talking about ingredients we both said we had saffron on hand…true foodies right there! Saffron is the soul to every Paella. It adds taste and fragrance identifiable with every bite! The third layer is the sucorrat. This layer is the finishing touch. Once the rice is ready the paella is done and the secret is the balance of ingredients. This also adds the crunchy finish to the bottom and sides! Are you drooling yet? This was delicious! You don’t have to make it on an open fire pit but if you get the chance to do it go for it! I will tell you one tip though and it is a very important tip…If you make this and wrap the dirty pan up in Saran Wrap without cleaning it that night, but do it in the morning…please have a gas mask on hand! :)) This is from experience! So wait no more… here is the recipe!
INGREDIENTS
1/4 cup olive oil
1/2 cup flat leaf parsley, chopped
1/2 cup dry white wine (we used Sauvignon Blanc)
1 pound large shrimp (we used gulf shrimp, but any large shrimp will work) peeled and deveined
2 bay leaves
1 pound haddock
2 red bell peppers, roasted
1 cup frozen peas
8 ounces Chorizo sausage (out of the casing and sliced into pieces)
1 Spanish onion, diced
1 (15 ounce) roasted tomatoes
2 small carrots, chopped
12 mussels, cleaned and debearded
2 1/2 cups rice, we used Arborio
6 chicken thighs, skin on, cut out the bone
1 lemon, sliced in wedges
6 cups warm water
1 tablespoon paprika
2 teaspoons oregano
Salt to taste
Pepper to taste
DIRECTIONS
Cook chicken in hot oil 5-6 minutes to brown the skin, remove from heat and set aside. Add onions to the hot pan cook 2-3 minutes then add all of the other veggies cooking 2-3 more minutes. Add the rice and the water and give it a really good stir. Now this is the important part… don’t stir for ten minutes. After ten minutes has passed, add the chicken, seafood, wine and lemon. Simmer until cooked through and the sucorrat forms. Remove Bay leaves and serve warm.
Enjoy,
NOTES
To roast red peppers rub them with olive oil and place them on a grill heated on medium turning every five minutes. When all of the sides have been charred take them off the heat and place them in a bag or cover in aluminum foil and let cool until they can easily be handled. When you can handle the pepper, remove the stems, cut the pepper in quarters and remove the peels and seeds. This can also be done in a 500 degree oven.
To debeard and clean the mussels:
When you get home with the mussels, unwrap them and discard any chips of broken mussels and any mussels that are open. Your mussels should be tightly closed. Soak the mussels in fresh water for about 20 minutes. To remove the beard hold the mussel in one hand and a dry towel in the other and grasp the beard and give it a sharp yank toward the hinge of the muscle. You will also need to brush off any additional sand and oceanic attachments. Finally rinse the mussels under cool tap water and set aside. When you are ready to use them, dry them with a towel, then add to your dish.
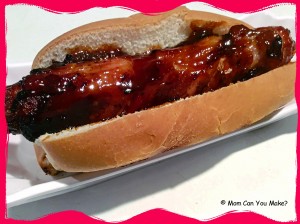
I started making these last summer and they are so tasty and can be changed up millions of ways. We are purist when it comes to these hot dogs. We simply like to wrap the hot dog in bacon, grill and baste with our favorite BBQ sauce!
INGREDIENTS
Hot dogs (your favorite variety)
Bacon (don’t use thick cut)
BBQ sauce (we use Kraft Honey BBQ sauce)
Toothpicks
DIRECTIONS
Preheat grill. Wrap hot dogs with bacon spiraling the bacon all the way down the dog. Secure with toothpicks. Place on the grill and while grilling, baste with BBQ sauce! Remove toothpicks when cooked through.
VARIATIONS
Slice hot dog lengthwise, but not cutting all the way through. Add your favorite cheese slices into the pocket of the dog but not over filling. Wrap with bacon and cook as directed above. You can also add pickled jalapeños along with the cheese! Mix and match and make your own creation. Let me know what you made and how they turned out!
Enjoy,
Stay In Touch


Follow me!
Recent Pins


