Dessert
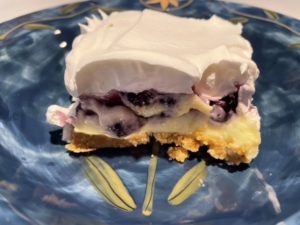
I found this no bake Blueberry Lemon Dessert on Pinterest from the website sweetordeal.com and it just looked so easy with bright flavors that I have been missing through this cold winter weather. This is typically made in a 9×13 dish but I made it in 2 8×8 pans so I could share with the N.H. Army National Guard unit my husband is in. This recipe is the perfect make ahead recipe as it needs to set up in the refrigerator for 2 hours before serving. This dessert is creamy, tart and sweet all in one bite. Everyone really enjoyed this dessert. I will be making this often!
INGREDIENTS
3 cups graham cracker crumbs
3/4 cup butter, melted
2 8 ounce packages of cream cheese, brought to room temperature
1 cup granulated sugar
Lemon juice from 2 medium lemons
1 cup 2% or whole milk
3.4 ounce box instant lemon pudding
24 ounce can blueberry pie filling
16 ounce tub of cool whip, thawed
DIRECTIONS
Mix graham cracker crumbs with the melted butter, set aside 1/2 cup to sprinkle on top if desired. Press the crumbs into the bottom of a 9×13 dish and set aside.
In a large mixing bowl throughly mix cream cheese and sugar until light and fluffy. Add the lemon juice and milk, mix well. Add the dry pudding mix and combine well. Drop by dollops over the graham cracker layer and gently spread evenly over forming the second layer.
Drop the blueberry pie filling on top of the lemon layer by spoonfuls and gently spread into an even layer.
Top with the cool whip and layer over the blueberry layer. If you reserved some of the graham cracker crumbs you can sprinkle the crumbs on top. I did not do this step I used all of the crumb for the base of the dessert.
Allow the dessert to set up for 2 hours in the refrigerator before serving.
Keep this dessert refrigerated.
Enjoy!
Anne

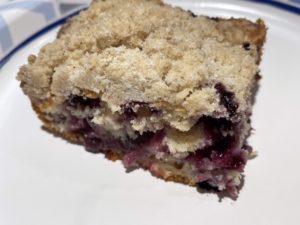
I made this particular dish for Robby even though we all tried it and loved it. I made this gluten free and dairy free. This is great warm from the oven or at room temperature. Great with your morning coffee!
INGREDIENTS
2 cups plus 1 Tablespoon (separated) gluten free flour, I used Bob’s 1 for 1.
2 teaspoon baking powder
1/2 teaspoon salt
3/4 cup sugar
1/2 cup butter, softened. I used Earth Balance
2 eggs
1 1/2 teaspoons vanilla
1/2 cup milk, I used fairlife
2 teaspoons apple cider vinegar
2 cups fresh blueberries
FOR THE STREUSEL
1/2 cup gluten free flour
1/3 cup sugar
4 Tablespoons butter, I used Earth Balance
1 teaspoon cinnamon
Pinch of salt
INSTRUCTIONS
Pre heat oven to 375 degrees.
Spray a 9×9 baking dish with non stick cooking spray and set aside.
Mix together the milk and apple cider vinegar stir and set aside.
In a medium size bowl whisk together 2 cups of gluten free flour, baking powder and salt. Set aside.
To make the streusel topping add all of the streusel ingredients to a medium size bowl and using 2 forks or a pastry cutter combine all of the topping ingredients until mixed and crumbly. Set aside.
In a large mixing bowl cream together the butter and sugar using a stand mixer or hand mixer. Mix in eggs and vanilla. Then alternate adding the milk and flour mixture.
Next mix 1 Tablespoon of the gluten free flour with the blueberries stirring to coat the berries. Gently fold the blueberries into the batter mixture. Spread the batter mixture evenly into your prepared pan.
Sprinkle the streusel topping evenly over the batter mixture.
Bake for 45 minutes then cover with foil and bake an additional 15 minutes, it’s done when a toothpick inserted in the middle comes out clean.
Let cool for 15 minutes before cutting.
Serve warm or at room temperature.
Enjoy!
Anne
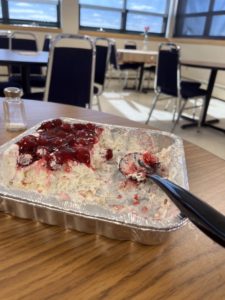
This recipe has been around for a long time but I just recently made it and I’m disappointed it took me so long to make as this is super good and very versatile. This is a no bake dessert that is made with simple ingredients that you can change up to your families liking. I made it as written and used cherry pie filling but you can use any pie filling you like! I split this into two 8×8 pans as half of it was being sent into Jim’s national guard unit. The picture below is the picture Jim sent me shortly after he put the dessert out. I’d say they liked it.
I recommend taking the dessert out of the fridge 30 minutes before serving.
INGREDIENTS
1 9 inch pre baked angel food cake
8 ounces cream cheese at room temperature
1/2 cup powdered sugar
1/2 cup milk
12 ounces of cool whip-thawed
2 can of cherry pie filling (42 ounces)
DIRECTIONS
In a large bowl whip the cream cheese, powdered sugar and milk until smooth. Gently fold in the whipped topping.
Break the cake into small pieces and add into the whipped mixture and fold to combine. Pour the mixture into a 9×13 inch baking pan spreading evenly. Spread the cherry pie topping on top covering the whipped mixture creating an even layer.
This should be stored in the fridge but taken out of the fridge 30 minutes before serving.
Enjoy!
Anne
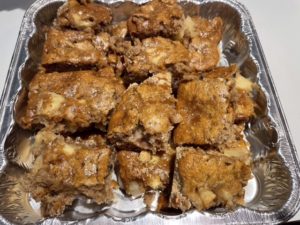
I pinned this recipe ages ago but just made them for the first time a few weeks ago and have made them weekly since! These got RAVE reviews not only from my family but from Jim’s Army National Guard unit along with my Dad’s gun club. Both places I sent them into there was not a crumb to be found! These are great as a morning bite with a cup of coffee or a simple dessert to share!
INGREDIENTS
2 cups all purpose flour
2 cups firmly packed brown sugar
1/2 cup butter, softened
1 cup chopped pecans
1 teaspoon cinnamon
1 teaspoon baking soda
Pinch of salt
8 ounces sour cream
1 teaspoon vanilla
1 large egg
2 cups peeled chopped apples, I used honey crisp.
DIRECTIONS
Heat oven to 350 degrees. In a large bowl combine flour, brown sugar and butter. Beat at low speed until crumbly. Stir in nuts. Press 2 3/4 cups of this mixture into the bottom of an un greased 13×9 pan.
Add the following ingredients into the remaining crumb mixture, cinnamon, baking soda, salt, sour cream, vanilla and egg. Mix well to combine. Stir in the apples and spoon evenly over the crumb mixture.
Bake at 350 for 30-35 minutes. Mine were done in 30 minutes. When an inserted toothpick comes out clean they are done. Can be served warm or cold. May I suggest some vanilla ice cream?
Enjoy,
Anne
As soon as I saw this recipe on Pinterest I knew Robby would love it and boy was I right! This is made gluten and dairy free, but I’m sure you could make it with dairy ingredients and it would be just as tasty!
I used a boxed gluten free brownie mix from stonewall Kitchen as that’s the best we have found but use your favorite brownie mix.
This takes time to cool so it’s a perfect make ahead dessert.
I found this recipe at www.thenomadicfitzpatricks.com
INGREDIENTS
1 box of gluten free/ dairy free brownie mix along with ingredients listed on the box to make the brownies.
1 package gluten free Oreo’s
8 ounce container of dairy free cream cheese
1/4 cup dairy free sour cream
1/4 cup granulated sugar
1/2 teaspoon vanilla extract
2 eggs, lightly beaten for the cheesecake layer
INSTRUCTIONS
Preheat oven to 325 degrees. Grease an 8×8 pan or 9×9 pan and set aside.
Prepare the brownie mix according to the package BUT DO NOT BAKE! Once mixed pour the batter into the prepared pan. On top of the brownie mixture add a layer of the Oreo’s , about 16. You can also cut some of the Oreo’s in half to fill in any gaps. That is the Oreo layer.
In a separate bowl whisk the dairy free cream cheese, dairy free sour cream, sugar and vanilla. This will be thick. Whisk the two eggs in a bowl and add those to your cream cheese mixture and stir until smooth.
Pour this mixture over your Oreo layer and spread evenly with a spatula, thus is your cream cheese layer.
Lastly crush 4 Oreo cookies and sprinkle them over the top of the cheesecake layer.
Bake for 40-45 minutes or u til edges are slightly golden brown. Cool the brownies to room temperature for about an hour then chill in the fridge for an additional 2 hours before slicing and serving.
Keep stored in the fridge.
Enjoy!

Stay In Touch


Follow me!
Recent Pins


