Cookies
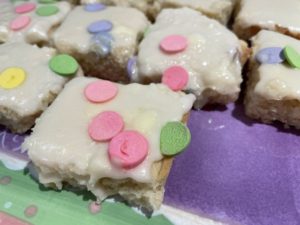
I came across a sugar cookie bar and adapted it to make it gluten and dairy free so Robby could enjoy them. Robby took one and had one bite and quickly turned to grab a second one. That speaks volumes. Jim and I also liked them so even your gluten eating friends will enjoy these sugar cookie bars. These were so easy to make and knowing how much Robby enjoyed them I know I will be making them often!
INGREDIENTS
1/2 cup butter, softened. I used Earth Balance
3/4 cup sugar
4 ounces cream cheese, I used Kate hill cream cheese
1 1/2 teaspoons vanilla extract
1 egg
1 1/2 cups gluten free flour, I used Bob’s one to one
1/2 teaspoon baking powder
1/4 teaspoon salt
INGREDIENTS FOR THE VANILLA FROSTING
6 Tablespoons butter, softened
1 1/2 cups powdered sugar
1 1/2 Tablespoons milk, I used fare life
1/2 teaspoon vanilla
Sprinkles or decorations if desired
DIRECTIONS
Pre heat your oven to 350 degrees. Line a 9×9 pan with parchment paper or tin foil sprayed with non stick spray allowing two of the sides to hang over allowing for easy removal.
In a large mixing bowl add butter and sugar and beat together using your stand or hand mixer until creamy.
Add your cream cheese and vanilla extract beating again until smooth. Add the egg and beat again.
To the same bowl add the flour, baking powder and salt. Mix until you have a smooth thick batter.
Add the batter to your pan spreading the batter out evenly. Bake for 20-23 minutes or until a toothpick inserted comes out clean.
Let cool completely before frosting.
FOR THE FROSTING- in a mixing bowl add butter, powdered sugar, vanilla and milk. Beat with your mixer until smooth and creamy.
When the bars are cool spread the frosting over the bars covering all of the cookie bars. Decorate with sprinkles if desired. Cut into bars. These are best stored in the refrigerator.
Enjoy!
Anne

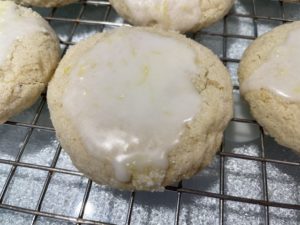
Spring is almost here but sadly it has not felt that way lately with all the snow storms that have been passing through! With another storm upon us and really wanting spring to be here sooner than later I decided to make some lemon sugar cookies. I made these gluten free but would be delicious using all purpose flour as well. The gluten eaters in the house enjoyed these as well, we had a house guest waiting out the storm with us so she could travel back to Virginia safely after the storm. We all agreed the tart frosting on the top really makes these cookies.
INGREDIENTS
1 1/2 cups gluten free flour I used Bob’s 1 for 1 baking flour
2 teaspoons baking powder
Pinch of salt
3/4 cup granulated sugar
1/2 cup unsalted butter at room temperature
1 large egg
1 teaspoon vanilla extract
1 Tablespoon fresh lemon juice
1 Tablespoon lemon zest
INGREDIENTS FOR ROLLING
1/4 cup sugar
1 teaspoon lemon zest
INGREDIENTS FOR THE GLAZE
1 cup powdered sugar
2 Tablespoon lemon juice
1 teaspoon lemon zest
DIRECTIONS
Pre heat oven to 340 degrees.
Spray your cookie sheets with non stick cooking spray and set aside.
In a medium bowl whisk together the gluten free flour, baking powder and salt. Set aside.
In another mixing bowl or in your stand mixer cream together the butter and granulated sugar for a couple of minutes, should be light and fluffy. Add the egg, lemon juice, lemon zest and vanilla extract. Mix until combined.
Add the dry ingredients and mix until just combined and there are no streaks of flour.
Scoop into 18 equal portions, I use a small cookie scoop for this but can be done by hand as well. You want them to be about the size of a ping pong ball.
In a small bowl mix together the ingredients for rolling. The granulated sugar and lemon zest. Roll the cookie dough balls completely into the sugar mixture and set them on the prepared cookie sheets 2 inches apart from each other. Spray the bottom of a glass with non stick spray and just slightly push the cookies down, not too flat though.
Bake at 340 degrees for 7-8 minutes until the edges are set and the top of the cookies are no longer shiny.
Let cool for 10-15 minutes before glazing.
To make the glaze combine the powdered sugar , lemon juice and lemon zest in a small bowl and stir until smooth. The glaze should be on the thicker side. Drizzle the glaze over the top of the cooled cookies and let the glaze set.
Enjoy!
Anne
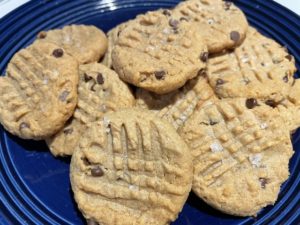
This recipe comes from Ree Drummond The Pioneer Woman. I made these for Robby but in reality both Jim and I liked these cookies just as much. I really liked the addition of the little sprinkle of salt on the top.
Not all recipes that are Gluten free are created equal but this is a recipe I will make anytime!
INGREDIENTS
1 cup peanut butter, I used creamy but crunchy works too
3/4 cup packed brown sugar
1 large egg
1/2 cup semi sweet chocolate chips, I used Good Life but any will do
1 teaspoon vanilla
Flaky sea salt for sprinkling
DIRECTIONS
Preheat oven to 375 degrees. Grease a baking sheet with non stick spray or line with parchment paper.
With an electric mixer beat together peanut butter, brown sugar , vanilla and egg until well combined. Stir in the chocolate chips with a wooden spoon.
Using a cookie scoop or your hands (lightly wet hands) form the mixture into 12 balls. Place the balls about 1 inch apart on the baking sheet. Lightly wet the tines of a fork and press cross cross pattern into the top of each cookie slightly pressing them down. Sprinkle lightly with flakey sea salt.
Bake u til just starting to brown 8-10 minutes. Let sit for a couple minutes on the pan then remove from the pan onto a backing rack to finish cooling.
Enjoy!

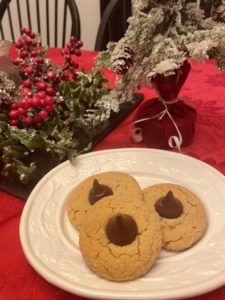
When it comes to gluten free cooking and baking I refer to Momma Knows Gluten Free quite often. This is one of her recipes and it’s delicious! Finding really tasty gluten free recipes for Robby is always a challenge but this one is one I will be making anytime of the year! I always try and have some desserts around for Robby especially now with all of the baking and cookie exchanges happening. This is a cookie that even the gluten eaters will like!
INGREDIENTS
1/2 cup gluten free peanut butter
1/2 cup granulated sugar
1/2 cup brown sugar, packed
1/2 cup unsalted butter, softened (I used smart balance)
1 teaspoon molasses
1 egg, room temperature
1 1/4 cups gluten free all purpose flour, I used Bob’s 1 for1 that includes xanthan gum
3/4 teaspoon baking soda
1/2 teaspoon gluten free baking powder
1/4 cup granulated sugar for rolling
Hershey kisses, unwrapped
DIRECTIONS
Add the granulated sugar, brown sugar, butter and peanut butter to a large bowl and mix with your mixer until fully combined and creamy.
Mix in the egg and molasses. Mix until fully combined.
In a medium bowl add the flour, baking soda, baking powder and whisk to combine, slowly pour the mixture into the batter and mix until fully combined. The cookie dough will be soft.
Cover the cookie dough and refrigerate for 30 minutes.
Preheat oven to 375 degrees. Add the 1/4 cup of granulated sugar to a small bowl to roll the dough in to.
Scoop 1 Tablespoon of dough and roll into a ball. Roll the ball into the sugar and place on a greased baking sheet.
Bake 10-12 minutes or until lightly browned on the edges.
As soon as you take the cookies out of the oven place the Hershey kiss in the center of each cookie and slightly push down. Allow to cool completely on a cooling rack. Store in an air tight container.
Enjoy!
Wow! Christmas is here already, this month has flown by! This is the only time of year I do a lot of baking. I make several cookies plates for friends and neighbors and this year was no different. I always make dipped pretzels, Christmas bark with pistachios and dried cherries, bourbon balls but this year I added these grinch cookies and for our friends with dogs I added some bone broth gummies for the little fur babies!
These cookies were so easy as it’s starts with a packaged sugar cookie mix.
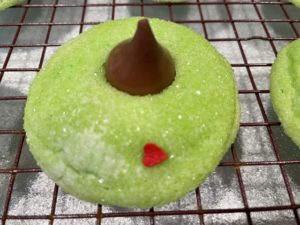
INGREDIENTS
1 package sugar cookie mix (about 17.5 ounce)
All of the ingredients called for on the sugar cookie package
Green food coloring
Green colored decorating sugar
Red heart cookie decorations
Hershey Kisses
DIRECTIONS
Heat oven to 375 degrees. Remove wrappers from chocolate kisses and set aside.
Mix cookies dough according to package directions. Add in a few drops of your green food coloring to get your desired color and mix well.
Shape dough into 1 inch balls and roll in colored sugar. Place on an ungreased cookie sheet about 2 inches apart.
Bake 7-9 minutes or until edges are lightly browned and the cookie is set. Remove from oven let cool just slightly. Put cookies on a cooling rack. Press a milk chocolate kiss in the center of each cookie. Add the heart. You can use a little baking gel icing if needed to help the heart stay.
Note-the chocolate kisses can get soft 9f added right out of the oven so it is best to let the cookie cool for just a minute or two.
Enjoy!
This recipe was on Pinterest.
Stay In Touch


Follow me!
Recent Pins


